
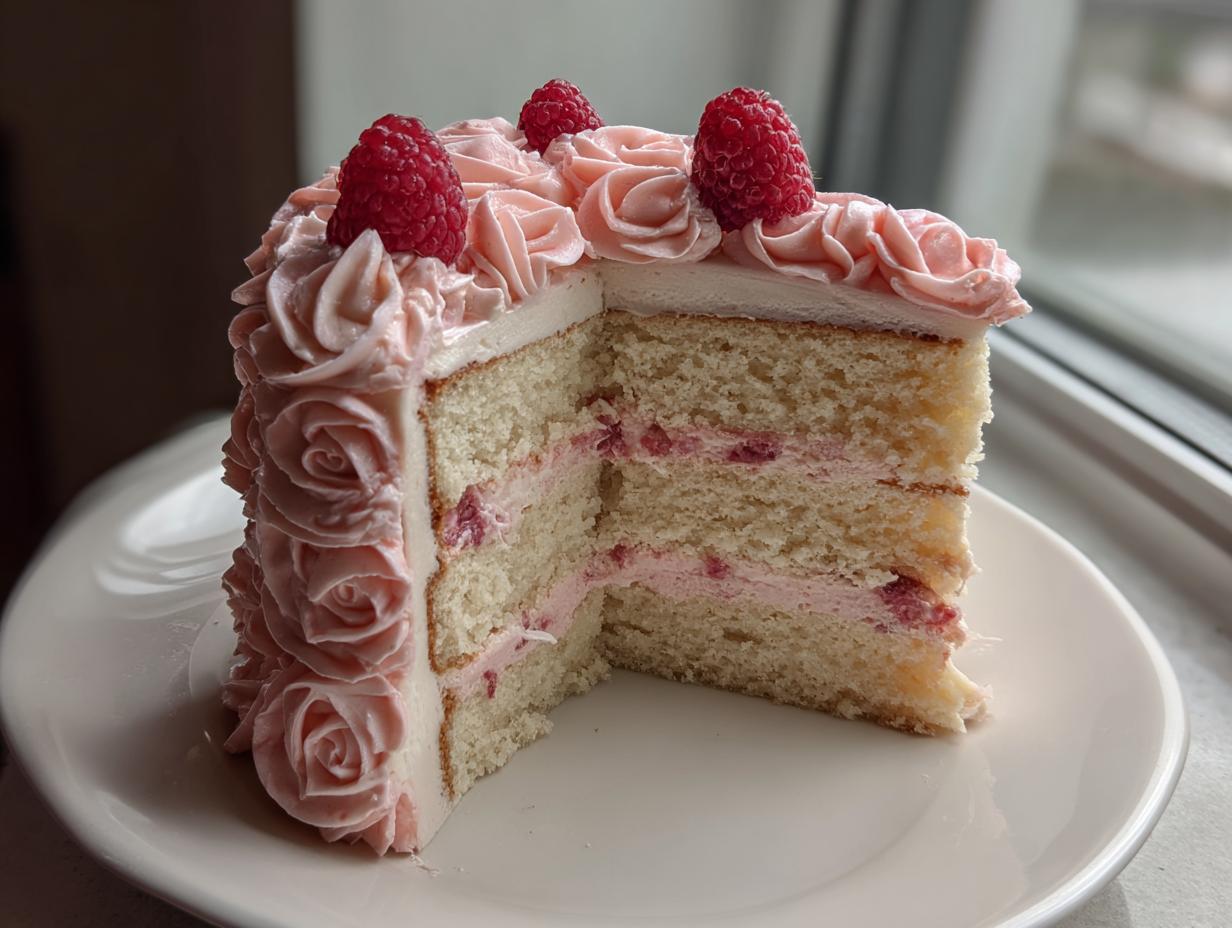
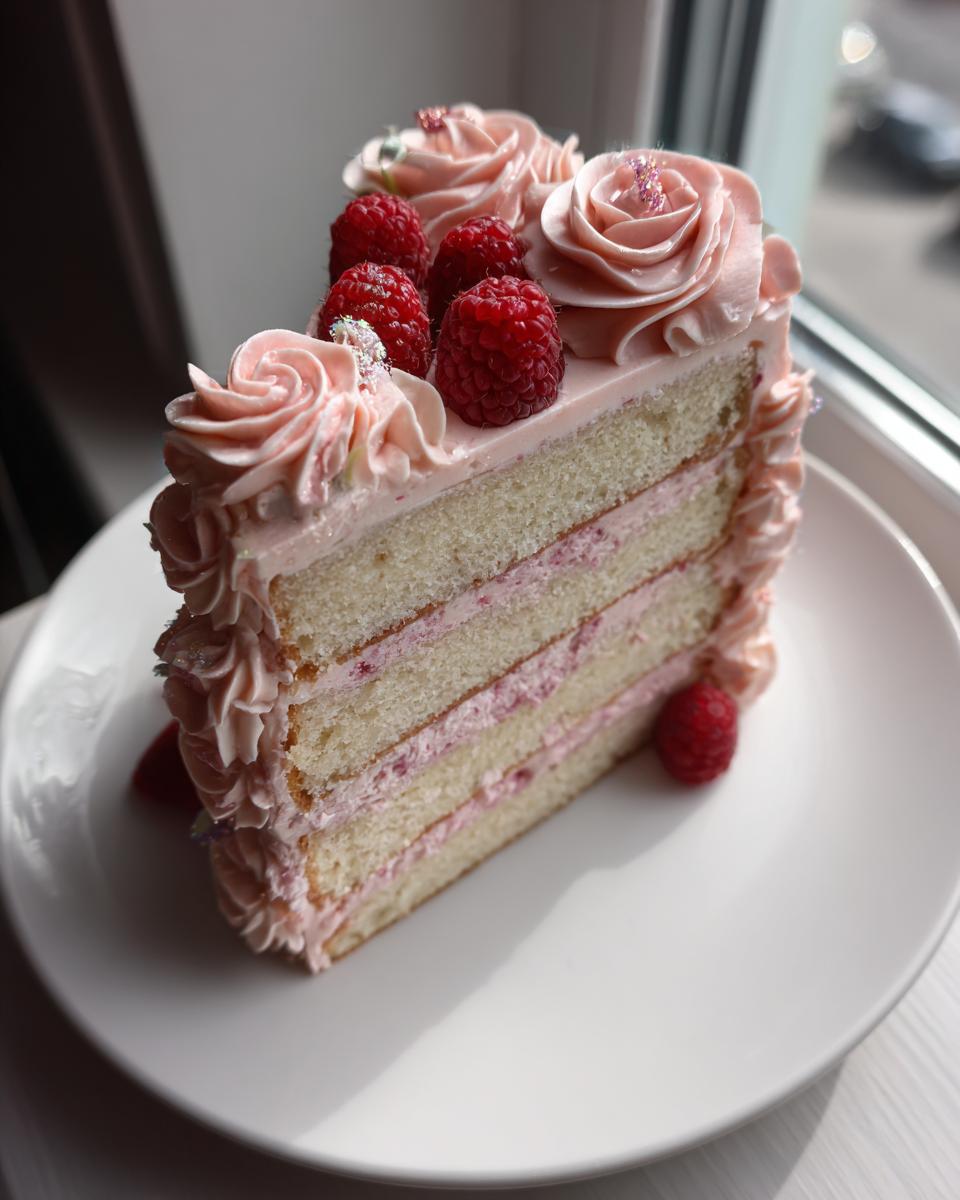
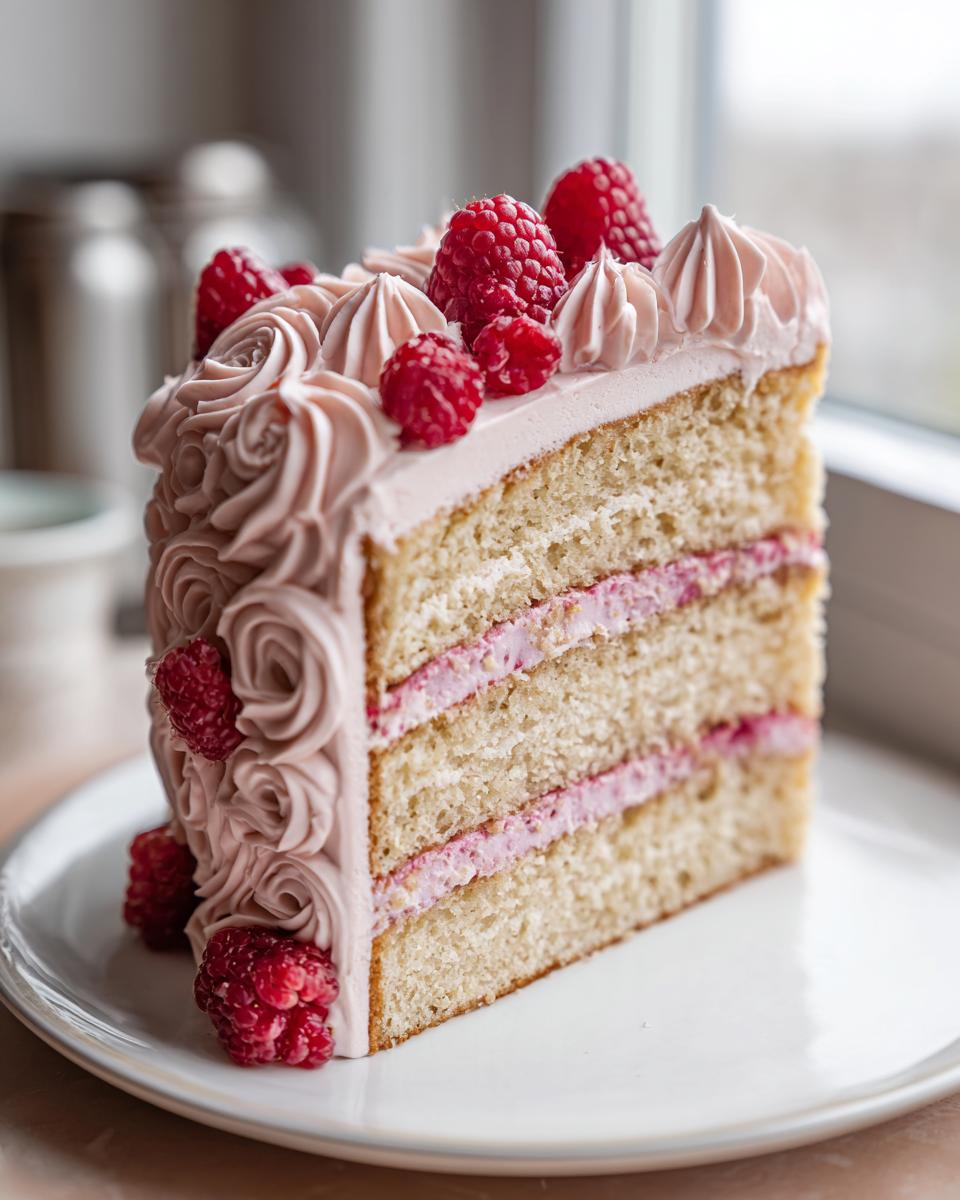
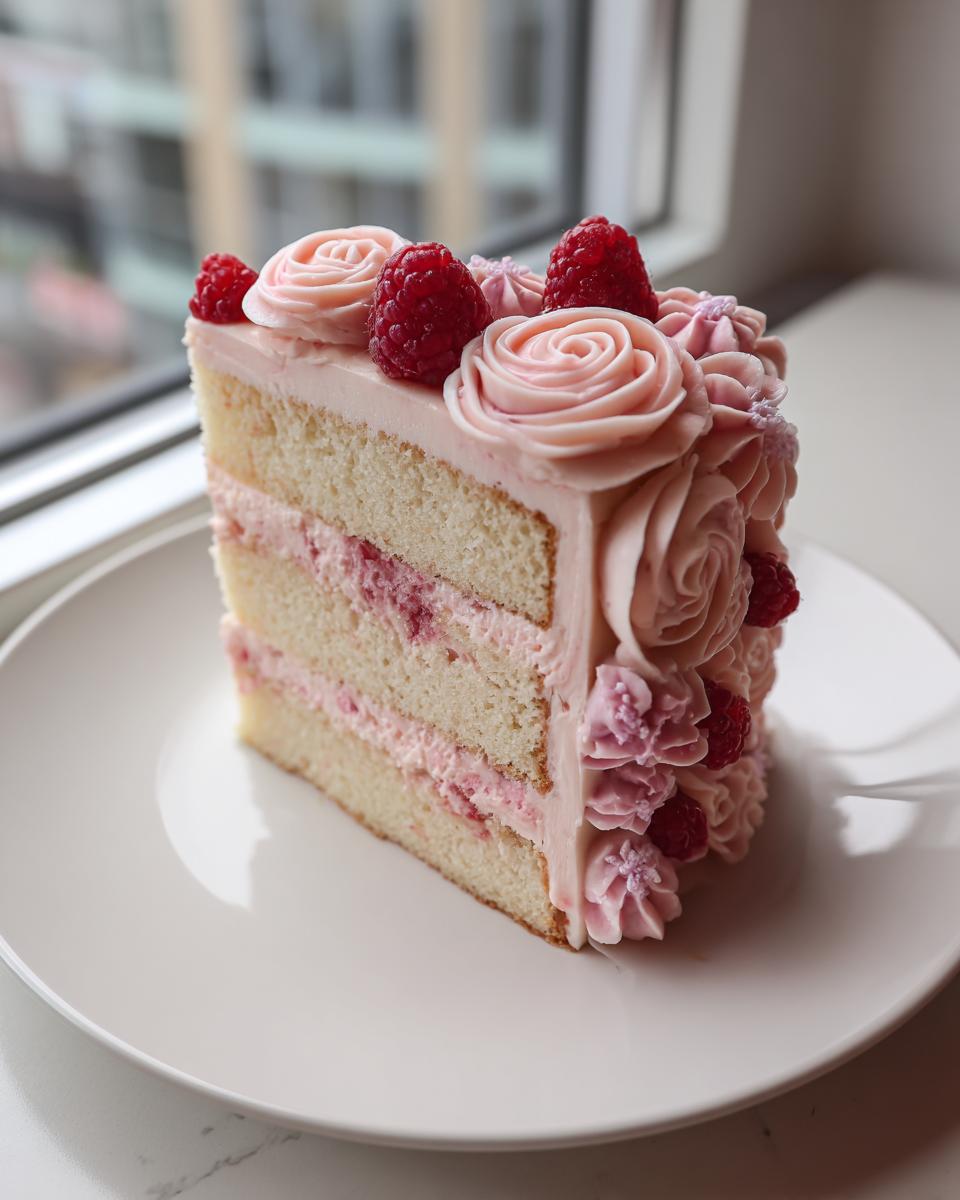
Sometimes, we just need a moment of elegant peace in our busy days, right? That’s exactly what I felt when I perfected this Raspberry Rose Layer Cake. You look at it, all covered in those perfect piped blossoms, and think, “Oh, that must have taken all day.” But truly, creating this stunning rose cake is all about finding simplicity in the process, which has always been my goal here at Pure Plate Path.
When I was navigating my most hectic work years, I learned that baking something truly beautiful, like this recipe that shines as a showstopping birthday cakes option, was a profound act of self-care. It brings a moment of stillness. This cake proves we don’t need complicated techniques to achieve stunning results; we just need the right balance of flavor and a little patience for the decoration.
- Why This Raspberry Rose Cake Recipe Works for You
- Gathering Ingredients for Your Raspberry Rose Cake
- Expert Tips for the Perfect Rose Cake Batter
- Step-by-Step Instructions for Baking the Rose Cake
- Mastering the Buttercream Rose Cake Tutorial for Decoration
- Flavor Variations for Your Next Rose Cake
- Storing and Keeping Your Elegant Anniversary Cakes Fresh
- Frequently Asked Questions About Making a Rose Cake
- Share Your Beautiful Rose Cake Creations
Why This Raspberry Rose Cake Recipe Works for You
I wanted a dessert that felt luxurious but didn’t require me to spend my entire afternoon fussing over it. This recipe nails that balance perfectly. It’s written for you—the busy home cook who deserves something truly special without the stress.
- This combination makes for such elegant anniversary cakes.
- The use of fresh raspberry puree keeps the cake light, which is essential when dealing with floral flavors.
Flavor Harmony: Raspberry and Rose
Rose water is beautiful but powerful, right? The tartness from the fresh raspberry puree cuts through that delicate floral note perfectly. It’s sophisticated, never soapy, and creates that complex flavor we aim for in our best desserts.
Achieving Showstopping Birthday Cakes Aesthetics
Visually, this cake is a showstopper. We focus on simple but impactful piping techniques. Anticipate the fun part where we dive deep into our Buttercream Rose Cake Tutorial; that’s where the real magic happens on the outside!
Gathering Ingredients for Your Raspberry Rose Cake
Okay, let’s talk about what we need! For this elegant bake, organization is everything. I always lay out my ingredients before I even turn the oven on. That way, when we start mixing, we aren’t scrambling for an egg or looking for the vanilla. We want this to feel peaceful, remember? I find that having everything measured out makes the process flow so much better. You can find my go-to recipe for making that fluffy vanilla buttercream frosting separately, but here are the specific amounts you’ll need for this raspberry rose combination.
For the Rose Cake Layers
These are the dry and wet components that build the foundation of our light layers:
- 1 3/4 cups all-purpose flour
- 1 1/2 cups granulated sugar
- 1 teaspoon baking powder
- 1/2 teaspoon baking soda
- 1/2 teaspoon salt
- 1/2 cup unsalted butter, softened
- 3 large eggs
- 1 teaspoon vanilla extract
- 1 teaspoon pure rose water (this is that delicate floral touch!)
- 1/2 cup buttermilk
- 1/2 cup fresh raspberry puree (make sure this is strained well!)
For the Rose Buttercream Frosting
For the frosting, we need great quality butter because it really carries the flavor. Don’t skimp here!
- 1 cup unsalted butter, softened (this needs to be truly creamy)
- 4 cups powdered sugar, sifted (trust me on the sifting part for smoothness!)
- 1 teaspoon vanilla extract
- 1/2 teaspoon rose water
- 1-2 tablespoons heavy cream (we adjust this for perfect piping stiffness)
And finally, for that beautiful finish:
- Fresh raspberries
- Edible rose petals for garnish
Expert Tips for the Perfect Rose Cake Batter
When you’re working with delicate flavors like this, the technique in the initial mixing stage really makes a difference in the final look and feel of your rose cake. Since we are using extracts and purees, we have to be extra mindful not to mute or overwhelm those subtle floral notes we worked so hard to include.
If you follow the steps above and mix everything on low speed, you’ll avoid toughening the batter. Overmixing is the quickest way to end up with a dense cake instead of that lovely fluffy texture we want!
Balancing Rose Flavored Cake Recipes
Speaking of those flavors, please listen to me on the rose water! It’s strong, almost perfume-like if you add too much. My notes suggest starting with just one teaspoon. If you taste the batter (and you absolutely should before baking!), and you feel it needs more punch, you can always drizzle a tiny bit more on top of the baked, cooled layers before frosting. But be careful—once it’s in the oven, you can’t take it out!
Achieving Uniform Cake Layers
For beautiful, even layers that stack up nicely without much trimming, you need to get the batter distributed perfectly. After you mix the final batter, use a kitchen scale if you have one. Split the weight evenly between your two 8-inch pans. This small step ensures both layers bake at the exact same speed and height. No lopsided cakes on my watch!
Step-by-Step Instructions for Baking the Rose Cake
I know the ingredients list looks long, but following these steps sequentially makes the baking process incredibly smooth. Think of it like following a beautiful olive oil cake recipe—precise actions lead to wonderful results! We’re moving from the dry bowl to the wet ingredients, building that tender crumb slowly and deliberately.
Mixing the Batter and Baking
This is where our olive oil cake recipe inspiration comes in handy—we want light aeration without developing tough gluten! Here are the first few crucial steps:
- First things first, let’s get that oven warmed up! Preheat your oven to 350°F (175°C). Make sure you grease and flour those two 8-inch round cake pans now so you’re ready when the batter is.
- Grab your big bowl and whisk together all the dry goodies: the flour, sugar, baking powder, baking soda, and salt. Give those a good mix to ensure everything is distributed evenly.
- Now, add that softened butter right into the dry ingredients. Mix it on a low speed. We are looking for a texture that looks like coarse, damp sand. This process coats the flour slightly, which helps keep things tender later on.
- In a separate, smaller bowl, whisk up your eggs, vanilla extract, and that special rose water until they’re just blended.
- Carefully pour the egg mixture into the large bowl with the flour and butter mix. Mix just until you see everything coming together. Don’t even think about whipping it yet!
- Take your buttermilk and raspberry puree—make sure that puree is smooth! Add about half of this liquid mixture into the batter and mix only until smooth. Then add the rest and mix until uniform. And here is my firmest rule: Do not overmix! Just stop when you don’t see streaks of flour anymore.
- Divide that beautiful batter evenly between your two prepared pans. Slide them into the oven and bake them for about 28 to 32 minutes. You want a toothpick inserted near the center to come out clean.
Cooling and Preparing for Frosting
Resist the urge to touch them immediately! Once they come out of the oven, let them rest in the pans on a wire rack for about 10 minutes. This little bit of gentle warmth helps them firm up just enough so they don’t tear.
After those 10 minutes, very carefully invert the cakes onto the wire rack and let them cool completely. And I mean completely cool. If you try to put frosting on a warm cake, even slightly warm, you’ll end up with a melted, sad mess, and trust me, you’ve put too much love into this cake for that to happen!
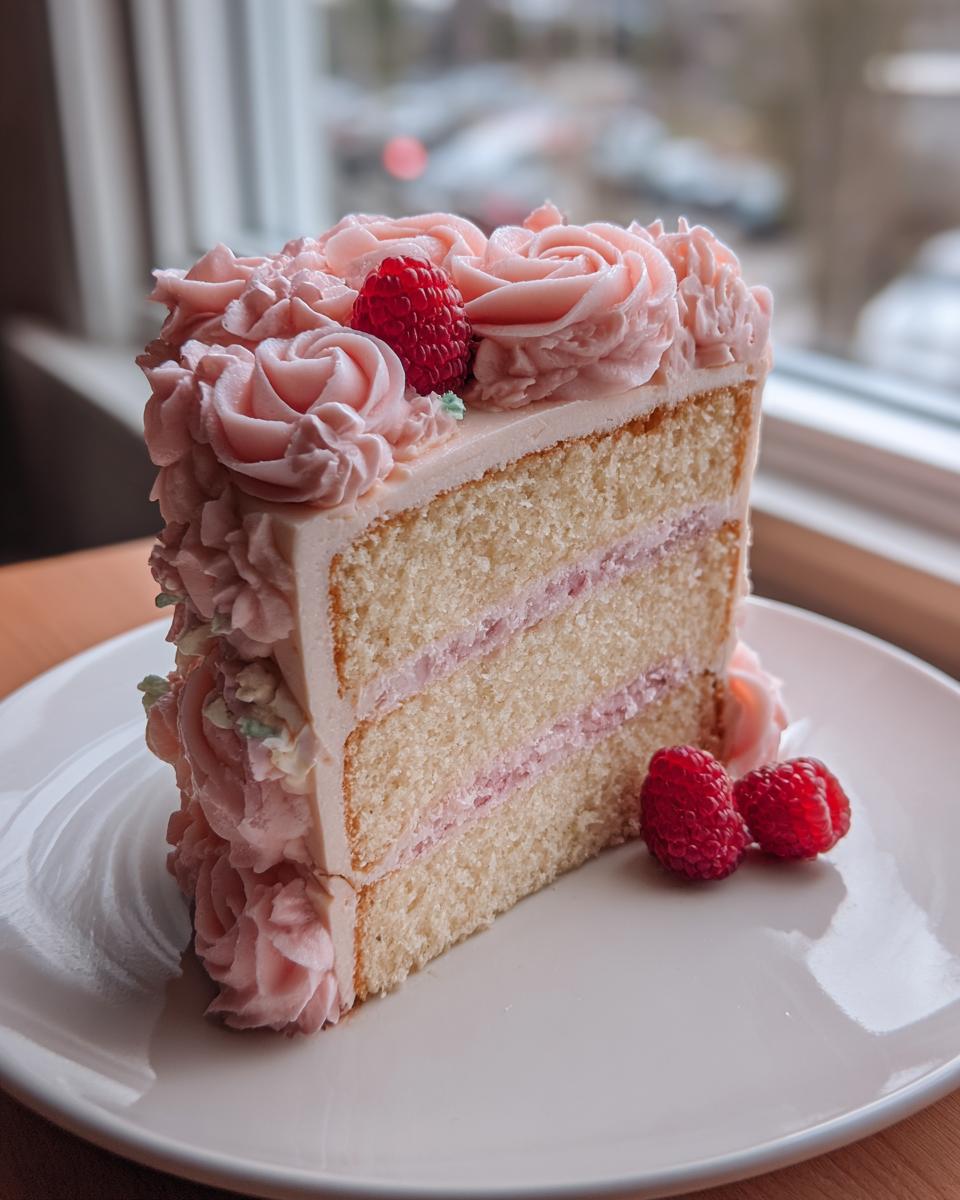
Mastering the Buttercream Rose Cake Tutorial for Decoration
Alright, deep breath! This is my favorite part where we transform that tasty cake into something breathtaking. I’m talking about visuals that truly make this the ultimate showstopping birthday cakes option. When I first started trying to pipe roses—oh boy!—it was a disaster. The icing would slump everywhere. But once I nailed the consistency, it became second nature. This whole process is what makes a great Buttercream Rose Cake Tutorial.
When I finally got the hang of piping, it felt like I unlocked a secret level of home baking confidence. You can completely transform your cake with just a few simple tools!
Creating the Perfect Pipeable Frosting Consistency
Remember step 9? That’s where we determine if our roses hold their shape or melt down our beautiful cake. Beating the butter until creamy is key. We add the powdered sugar gradually, just like we did with Grandma’s old recipes, to keep things soft. Then, we go slow with the heavy cream and the extra splash of rose water. If it feels too thick, add cream a tiny bit at a time. You really need that stiffness, otherwise your piped rose will just look like a sweet puddle. Stiff enough to stand tall when squeezed out of the tip—that’s what we want!
How to Pipe Rosette Cakes Successfully
Before we start decorating, make sure you’ve chilled your cake after that thin crumb coat (that’s step 11). That coat locks in any loose crumbs, guaranteeing that when you pipe your final layer of frosting, it’s perfectly, flawlessly smooth. For stepping up your Piping Rosette Cakes game, grab a star tip—the Wilton 1M is my absolute favorite tool for this rose cake!
Pipe the roses starting from the center and swirling outward gently. Don’t press too hard! Once the top is covered with your blooms, you can decorate the sides with matching rosettes or simple shells. Trust me, once you see how great those piped flowers look, you’ll be excited to try this technique on everything!
Flavor Variations for Your Next Rose Cake
I love this recipe because it’s almost a template! Once you master the base, you can take this rose cake in so many beautiful directions. The raspberry is wonderful, but if you ever want to explore a richer profile, I have some fantastic ideas for you that move beyond the standard strawberry pairings.
This is where home baking gets really fun—creating something that is uniquely yours. Let’s look at how we can swap out the fruit for some other incredible flavors that just sing alongside that fragrant rose water.
Pistachio Rose Cardamom Baking Inspirations
If you are looking for something truly elegant and a little warmer, think about leaning into those wonderful Middle Eastern flavor profiles. Swapping the raspberry puree for ground pistachios and adding just a whisper of cardamom to the dry ingredients transforms this cake entirely. It becomes part of that sophisticated Pistachio Rose Cardamom Baking group. You’d still use the rose water in both the cake and the frosting, but it adds a delicious earthy nuttiness.
Neapolitan Cake Creations with Rose
Remember that little note I put down about making this a Neapolitan cake? That is such a fun way to decorate a layer cake if you have different tastes in the family! You divide the batter into three portions. One stays as the delicate rose vanilla, another gets some strawberry extract, and the third gets cocoa powder for chocolate. Frost them all together, and you have a truly fun, tri-color effect that still carries that floral hint in the base layers.
Storing and Keeping Your Elegant Anniversary Cakes Fresh
Now that you’ve put all that love into baking and decorating this stunning creation, we absolutely need to make sure it stays perfect! Since we are using fresh raspberry puree in the cake and a proper American buttercream on the outside, storage is a little different than just leaving something on the counter.
For the best results, especially since this cake makes such lovely elegant anniversary cakes, you want to treat it gently. Buttercream is our best friend here for preservation, but it doesn’t like being too cold, either!
Reheating and Serving Temperature
The refrigerator is the best place for keeping this layered beauty safe for up to four days. Just cover it loosely with a cake dome or aluminum foil—make sure the foil doesn’t touch the piped roses, or you’ll smudge them right off! It needs to be covered because the buttercream will absorb any funky smells if left uncovered.
But here is the most important serving tip I learned the hard way: You cannot serve this cake straight from the fridge! When it’s cold, the butter in the cake layers and the frosting becomes totally hard, and the texture is stiff, not tender. Always pull your gorgeous rose cake out about an hour before you plan to slice into it. Letting it come up to room temperature allows the butter to soften just enough so that the cake has that beautiful, melt-in-your-mouth texture we baked it for!
Frequently Asked Questions About Making a Rose Cake
I know we covered a lot, from flavor balancing to piping tips! It’s totally normal to have a few lingering questions, especially when you’re trying out something as special as this rose cake for the first time. Don’t worry about it; the best home cooks always ask questions! Here are the ones I hear most often about mastering these beautiful floral desserts.
Can I use extract instead of rose water in my rose cake?
Oh yes, you definitely can! Sometimes the pure rose water isn’t nearby. The main thing to remember is that rose extract is way more intense than the water, so you need to dial it back. If a recipe calls for one teaspoon of water, start with just half a teaspoon of extract. You can always add more later, but if you dump in too much extract, the whole cake might taste like perfume. Seriously, start small and taste test!
What is the best way to store leftover Rose Flavored Cake Recipes?
Because we use real fruit puree and that lovely buttery frosting, we have to be good about storage. For any leftover slices of your Rose Flavored Cake Recipes, your best bet is the refrigerator. Cover each slice loosely with plastic wrap or foil so the frosting doesn’t dry out or pick up fridge smells. It stays perfect for about four days that way. Remember what I said about letting it warm up before eating!
Are edible flowers safe to use on this cake?
They are, and aren’t they stunning? We use them for garnish here in the final step, and they really elevate the look. Just make sure you source them correctly. You can’t just grab flowers from the garden unless you know for sure they haven’t been sprayed with anything harmful. Buy them specifically labeled as food-grade edible flowers from a reputable source. If you aren’t sure, skip them! The buttercream roses look gorgeous all by themselves, too.
Share Your Beautiful Rose Cake Creations
Well, friends, that’s the whole journey! We’ve gone from simple pantry staples to creating something truly elegant—a beautiful Raspberry Rose Layer Cake that tastes as amazing as it looks. I really hope you take the time to try this when you need a dessert that shows a little extra love.
Baking is always better when shared, and I absolutely live to see what you all create in your kitchens! Please come back and let me know how everything turned out. Did your buttercream roses look perfect? Did the flavor combination sing?
If you loved this recipe and found peace and simplicity in tackling this showstopper, I would be so grateful if you could leave this post a star rating right near the top! And please, tag me on social media when you finish your stunning rose cake! Seeing your creations is the fuel that keeps me baking and sharing these recipes. Happy baking, and I can’t wait to see your floral masterpieces!
PrintElegant Raspberry Rose Layer Cake with Fresh Buttercream Roses

Create a showstopping dessert featuring delicate rose flavor balanced with tart raspberry, finished with beautiful piped buttercream roses. This recipe focuses on simple, elegant baking for special occasions.
- Prep Time: 35 min
- Cook Time: 30 min
- Total Time: 65 min
- Yield: 10 servings 1x
- Category: Dessert
- Method: Baking
- Cuisine: American
- Diet: Vegetarian
Ingredients
- 1 3/4 cups all-purpose flour
- 1 1/2 cups granulated sugar
- 1 teaspoon baking powder
- 1/2 teaspoon baking soda
- 1/2 teaspoon salt
- 1/2 cup unsalted butter, softened
- 3 large eggs
- 1 teaspoon vanilla extract
- 1 teaspoon pure rose water
- 1/2 cup buttermilk
- 1/2 cup fresh raspberry puree
- 1 cup unsalted butter, softened (for frosting)
- 4 cups powdered sugar, sifted (for frosting)
- 1 teaspoon vanilla extract (for frosting)
- 1/2 teaspoon rose water (for frosting)
- 1–2 tablespoons heavy cream (for frosting)
- Fresh raspberries and edible rose petals for garnish
Instructions
- Preheat your oven to 350°F (175°C). Grease and flour two 8-inch round cake pans.
- In a large bowl, whisk together the flour, sugar, baking powder, baking soda, and salt.
- Add the softened butter to the dry ingredients and mix on low speed until the mixture resembles coarse sand.
- In a separate bowl, whisk together the eggs, vanilla extract, and rose water.
- Gradually add the egg mixture to the flour mixture, mixing until just combined.
- In a small bowl, mix the buttermilk and raspberry puree. Add half of this liquid mixture to the batter and mix until smooth. Add the remaining liquid and mix until the batter is uniform. Do not overmix.
- Divide the batter evenly between the prepared pans. Bake for 28 to 32 minutes, or until a toothpick inserted into the center comes out clean.
- Let the cakes cool in the pans for 10 minutes before inverting them onto a wire rack to cool completely.
- Prepare the buttercream: Beat the softened butter until creamy. Gradually add the sifted powdered sugar, mixing until combined. Add vanilla extract and rose water. Add heavy cream one tablespoon at a time until you reach a smooth, pipeable consistency.
- Once cakes are completely cool, place one layer on a serving plate. Spread a layer of buttercream over the top. Place the second layer on top.
- Frost the entire cake with a thin crumb coat and chill for 15 minutes. Apply the final layer of frosting.
- Use a piping bag fitted with a star tip (like Wilton 1M) to pipe buttercream roses onto the top and sides of the cake.
- Garnish with fresh raspberries and edible rose petals before serving.
Notes
- For an intense rose flavor, increase the rose water in the cake batter to 1 1/2 teaspoons, but taste carefully as rose water can become overpowering quickly.
- If you want to make this a Neapolitan cake, divide the batter into three portions and flavor one with cocoa powder, one with strawberry extract, and leave one plain vanilla.
- To achieve the best buttercream roses, make sure your frosting is slightly stiff; if it is too soft, the piped roses will lose their shape.
Nutrition
- Serving Size: 1 slice
- Calories: 480
- Sugar: 55g
- Sodium: 210mg
- Fat: 26g
- Saturated Fat: 16g
- Unsaturated Fat: 10g
- Trans Fat: 0.5g
- Carbohydrates: 60g
- Fiber: 1g
- Protein: 5g
- Cholesterol: 95mg