
When life gets busy, and you just need something that tastes exactly like childhood—something sweet, soft, and that requires zero oven time—you need to pull out the big guns. For me, Sarah Miller, nothing brings back that cozy feeling faster than a proper, creamy dirt cake. Forget complicated baking projects! This Ultimate No-Bake Oreo Dirt Cake is the ultimate comfort food rescue when you need a big, decadent dessert fast. It’s the kind of recipe forged in the fires (or lack thereof!) of everyday life, proving that the best food comes from simple, honest ingredients. You can read more about how my journey back to simple cooking started right here.
- Why This No Bake Dirt Cake is Your New Family Favorite Desserts Go-To
- Gathering Ingredients for Your Classic Dirt Cake Delight
- Step-by-Step Instructions for the Ultimate No Bake Dirt Cake
- Presentation: Making Dirt Cups with Gummy Worms Fun
- Tips for Success with Your Oreo Dirt Cake Recipe
- Make Ahead Dessert and Storage Instructions
- Variations on the Chocolate Pudding Dessert
- Frequently Asked Questions About This Recipe
- Nutritional Information Estimate
Why This No Bake Dirt Cake is Your New Family Favorite Desserts Go-To
Honestly, if you’re looking for a winner that doesn’t involve turning on the stove, this is it. This recipe became my secret weapon when I was juggling my marketing job and trying to keep up healthy habits—it’s the definition of Family Favorite Desserts because it requires almost no actual cooking! You just mix, layer, and chill. It’s always the first thing gone at any gathering, making it supremely Potluck Friendly Desserts material. Check out my tips on streamlining weeknight cooking; this dessert fits that busy lifestyle perfectly.
The entire assembly process is shockingly fast. Who has hours to bake? Not us!
Quick Dessert Ideas and Assembly Time
We’re talking about 25 minutes of active time here, which is fantastic when you need Quick Dessert Ideas. You do need patience, because while you’re only mixing for 25 minutes, the magic happens in the fridge. You absolutely must let it chill for at least 4 hours, but trust me, overnight is even better for those creamy, defined layers to set up perfectly.
Gathering Ingredients for Your Classic Dirt Cake Delight
Getting started on this Classic Dirt Cake Delight is honestly half the fun because you probably have most of this stuff hanging out in your pantry or freezer already. We aren’t dealing with sourdough starters or rare spices here, people! We are going straight for comfort. Because this is a no-bake recipe, getting your ingredients perfectly prepared—like making sure the butter and cream cheese are truly softened—is what makes the difference between a lumpy mess and those gorgeous Creamy Dirt Cake Layers.
Here is exactly what you’ll need to gather up for this amazing dessert. Head over to my chicken chili recipe if you need a savory palate cleanser later!
- One full package (about 14.3 ounces) of Oreo cookies. Don’t skimp!
- 8 ounces of cream cheese—remember, it *must* be softened, leaving an indent when you press lightly.
- 1 cup of unsalted butter, also softened. I always keep mine out a couple of hours before I plan to mix.
- 1 cup of powdered sugar.
- A big container (12 ounces) of frozen whipped topping, fully thawed.
- Two packages of instant chocolate pudding mix—the 3.9 ounce size.
- 3 cups of cold milk. Cold is key here!
- For the very top, you’ll need one more container (8 ounces) of thawed whipped topping.
- A handful of gummy worms because, well, we aren’t savages.
Ingredient Notes and Substitutions for Creamy Dirt Cake Layers
Let’s talk specifics, because this is where we ensure those Creamy Dirt Cake Layers are perfect. For the cookies, you absolutely must use the whole Oreo, cream filling and all! That cream filling acts like a little binder in your Oreo Cookie Crumble. If you try to scrape it out, you’re just wasting deliciousness and making your job harder.
Regarding the pudding, I called for chocolate above because it tastes the richest with the cream cheese, but hey, this is your kitchen! If you prefer those lighter layers that some people swear by, you can certainly substitute vanilla pudding. Just make sure it’s the *instant* kind—we are not messing around with cook-and-serve mixes for this quick dessert. Instant sets up faster and ties into the no-bake theme perfectly.
Step-by-Step Instructions for the Ultimate No Bake Dirt Cake
Okay, it’s time to get your hands dirty—literally! This process is so straightforward, it feels almost magical how quickly this dessert comes together. We follow the steps exactly to ensure we get that perfect, luxurious texture instead of something stiff. You can check out my guide on making simple bread if you want to practice your mindful mixing, but for this delicious dessert, follow my lead closely.
First things first: we need our ‘dirt’! Take about 1 cup of those finely crushed Oreos—yes, the same ones you crushed earlier—and stash them away in a small bowl. That’s reserved for the grand finale on top. Don’t accidentally dump it all in the bottom layer, or you’ll end up with a sad, thin topping later!
Creating the Cream Cheese Dirt Cake Filling
This is where we build the backbone of our dessert. In a large mixing bowl, you need to beat that softened cream cheese, the softened butter, and the powdered sugar together. You have to whip this! Don’t just stir it; beating it until it’s entirely smooth and lightens up a bit ensures you don’t have any little lumps of cream cheese hiding in your final product. That quality mixing creates the best base for your Cream Cheese Dirt Cake Filling.
Once that base is perfect, gently fold in one container of the thawed whipped topping. Just fold it, please—we want to keep the air we just beat in! Then, while that’s resting, whisk the two packages of instant chocolate pudding mix with the 3 cups of cold milk in a separate bowl. Whisk this until it starts getting thick; usually about two minutes of good, steady work. Slowly, gently, fold that thickened pudding right into the cream cheese mixture until you have a unified, sweet, fluffy mass. Wow, that smells incredible already!
Assembling the Simple Layered Oreo Dessert
Now for the fun part—the layering! Grab your trifle dish or your 9×13-inch pan. We are building this masterpiece carefully to create those beautiful, distinct Simple Layered Oreo Dessert strata. Start by spreading about half of your remaining crushed Oreos evenly across the bottom of the pan. This layer soaks up a little moisture, making it the best part for those who sneak a bite before chilling!
Next, take half of that glorious cream cheese-pudding mixture and spread it right on top of the first Oreo base. Smooth it out gently so you don’t disturb the cookie layer too much. And then, we just repeat the pattern! Spread the rest of your crushed Oreos over that creamy layer, and then top it all off with the rest of the creamy chocolate mixture. See? So easy! We are almost done layering before we hit the final frosting stage.

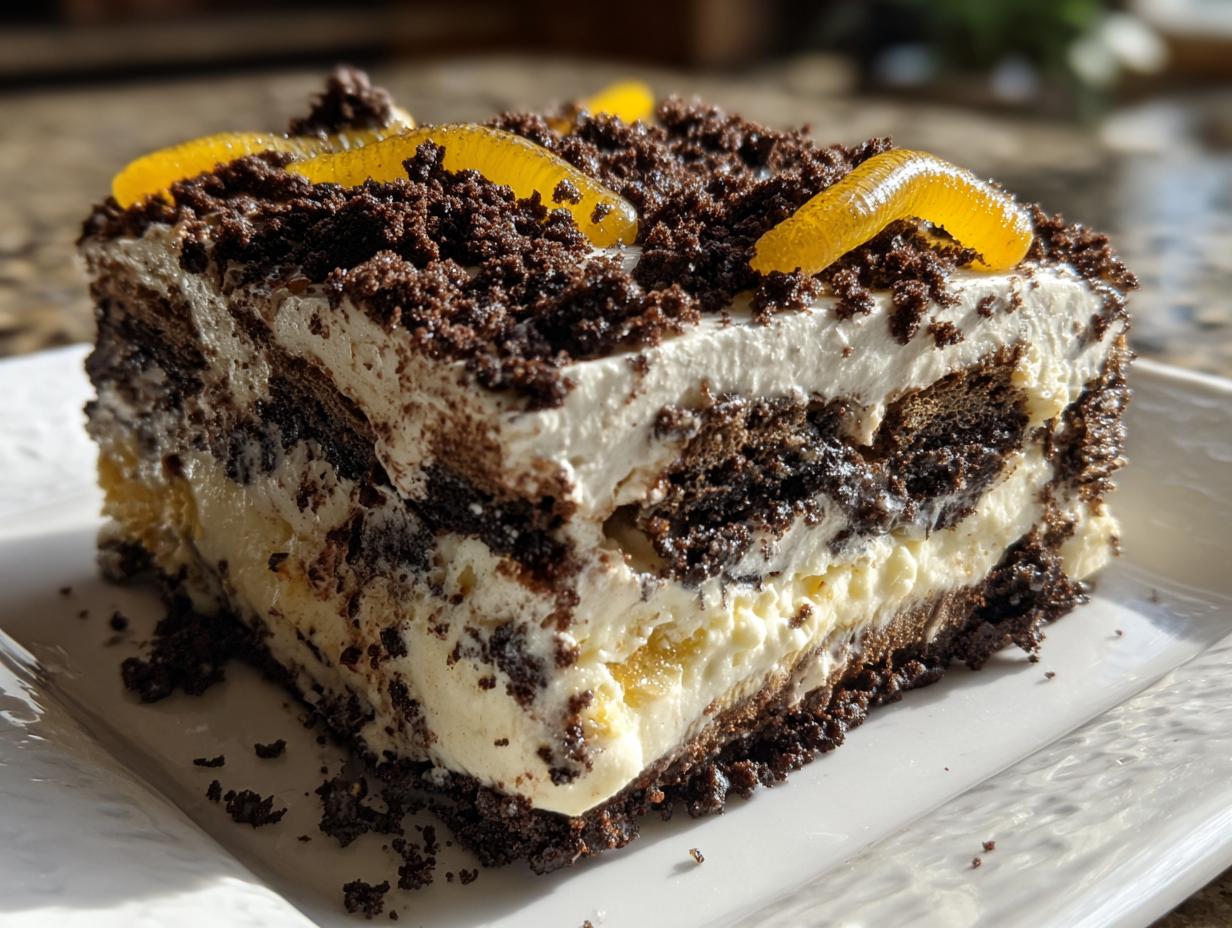
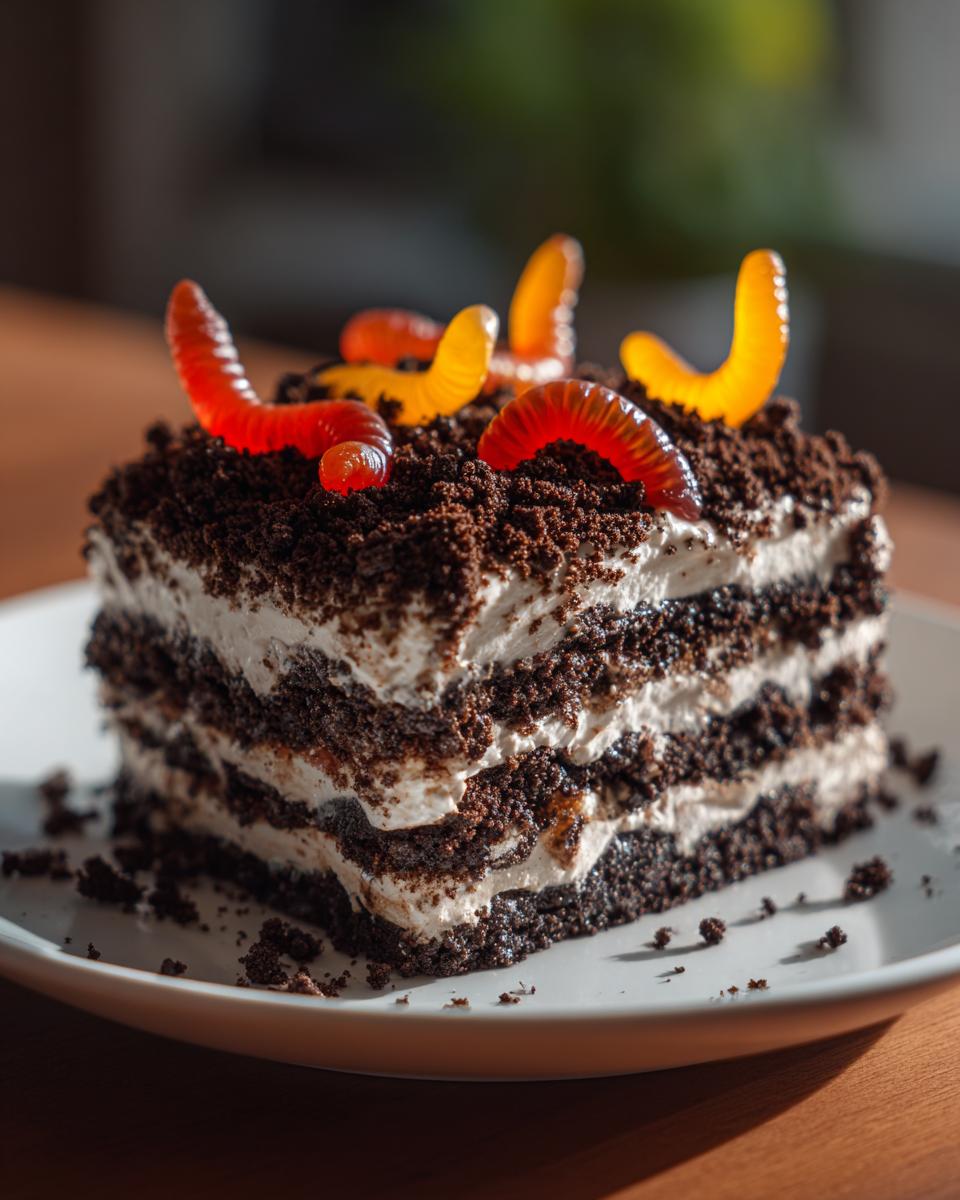
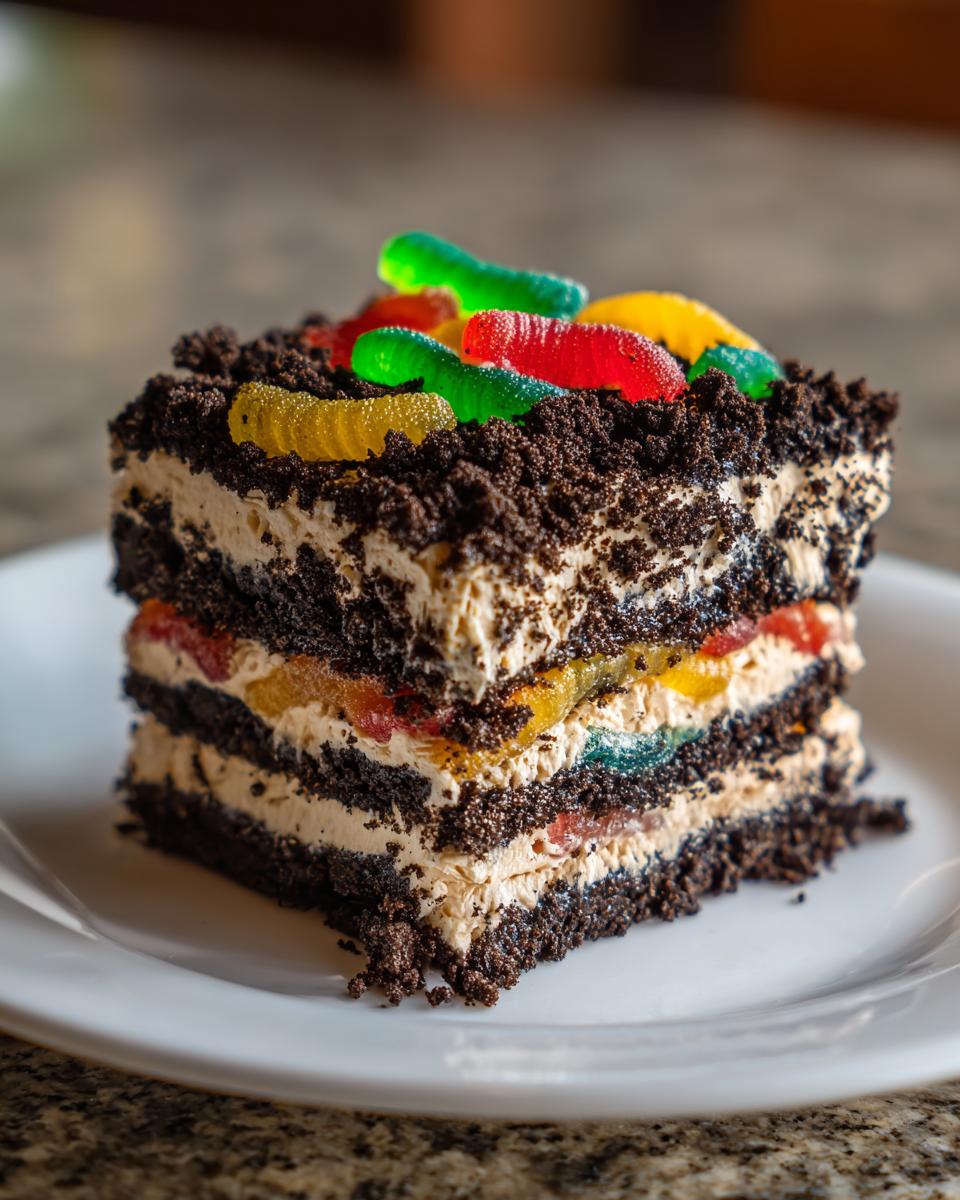
Presentation: Making Dirt Cups with Gummy Worms Fun
We’ve got all those incredible, creamy layers stacked up, but what good is a dirt cake if it doesn’t look like, well, dirt? This final step is pure theater, and it’s what makes this recipe the ultimate Dessert for Parties. Whether you’ve built this beauty in one big dish or you’ve individually assembled little Dirt Cups with Gummy Worms, the finish is the same!
Take that final container of thawed whipped topping—the reserved one—and spread it evenly over the top chocolate layer. This acts as the binder for our final layer of soil. You don’t have to be perfect here; a slight wave or swoosh looks natural, just like real earth!
Now, grab those reserved cookie crumbs you saved earlier—the ones that look like beautiful, dark chocolate dust. Sprinkle them liberally all over the whipped topping. Seriously, cover every bit of white! The kids—and honestly, me too—love watching this step because it instantly transforms from a creamy dessert into a muddy masterpiece.
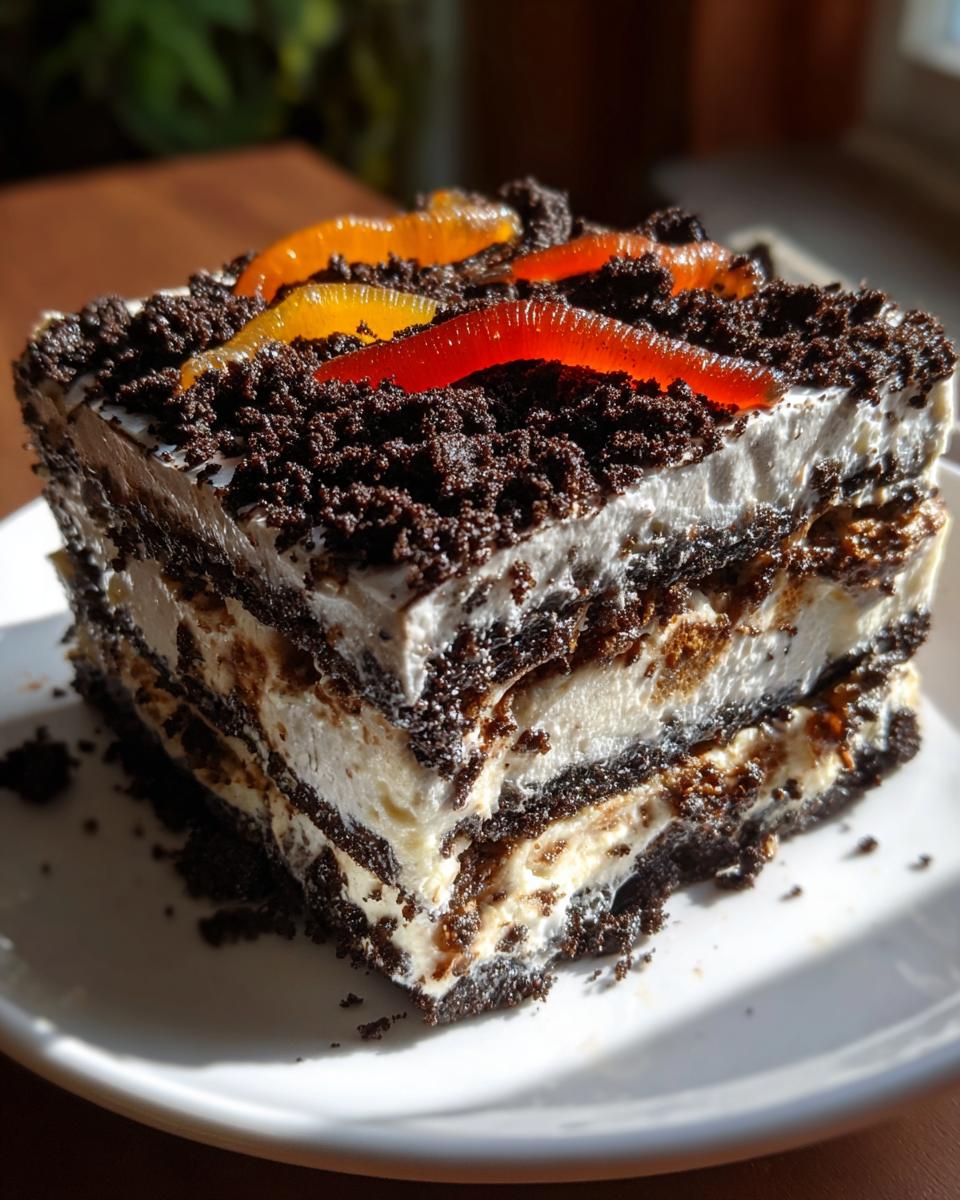
The very best part? Taking those multi-colored gummy worms and just sticking them right into the crumbs. Make them look like they are struggling to climb out or maybe just sitting there enjoying a nice dip. It’s goofy, it’s fun, and it’s why this is such a fantastic Kid Friendly Dessert. Once those worms are happily burrowed in, cover the whole thing up tight. It needs that quiet time in the fridge to let all those layers marry together, usually a minimum of four hours, but if you can manage an overnight chill, you won’t regret it!
Tips for Success with Your Oreo Dirt Cake Recipe
Even though this is one of the easiest recipes in my whole collection, there are just a few little expert things you need to know to make sure it turns out absolutely perfect every single time. If you skip these small details, you might end up with pudding that’s too runny or a cream layer that separates, which nobody wants! I learned these tricks the hard way, so you don’t have to. For more tips on maximizing texture in simple recipes, check out how I make my mashed potatoes so fluffy!
When I first started making this, I learned very quickly that the texture of your ingredients matters way more in a no-bake dessert than in a baked one. We are relying on cold setting rather than oven structure, so preparation is everything. For more inspiration on classic, reliable recipes, take a look at this old favorite I found when researching the history of this dessert: Oreo Dirt Cake history link.
First, let’s talk about softening. If your butter or cream cheese is too cold when you start mixing the filling, you’ll end up fighting lumps the whole time. You want them soft enough that you can press a finger into them easily at room temperature. If you’re trying to rush this, warm them slightly in the microwave—but be careful! Melted butter is really hard to fix in a cream filling, so go slow!
Next big thing: Pudding types! You absolutely must use *instant* pudding mix here. Please do not grab the cook-and-serve vanilla or chocolate! Instant pudding is designed to set up quickly when only paired with cold milk and the structure of the cream cheese, giving us those firm, sliceable layers. Cook-and-serve is too wet and never quite firms up properly in this setup, resulting in soup.
Finally, that chilling time. I know, I know, you made this for a party tonight and it’s only been an hour. But you have to resist the urge! Those four hours are crucial for the pudding and the cream cheese mixture to lock everything in place. If you can possibly plan ahead and let this chill overnight, I promise you, the texture becomes unbelievably smooth. The flavors deepen, the cookies soften just the right amount, and you get the cleanest slices imaginable. It’s worth the wait; this is one Make Ahead Dessert that truly improves with time!
Make Ahead Dessert and Storage Instructions
One of the things I love most about this Oreo Dirt Cake Recipe is that it’s truly the ultimate Make Ahead Dessert. When you’re hosting, or just trying to manage a busy week, having a dessert ready to go in the fridge is a game-changer. It takes the pressure off that last hour before guests arrive or before you need to pack something for a big group!
I strongly recommend making this the day before you plan to serve it. Why? Because letting it chill overnight does wonders for the texture. Those layers of crushed Oreo cookie crumble soften just enough that they meld beautifully with the creamy chocolate pudding filling, giving you that perfect, sliceable consistency. It’s amazing how much better it tastes on Day Two!
If you’re looking for other incredibly easy, no-fuss recipes that save you time later, you have to check out my recipe for creamy peanut butter fudge. It shares that same ‘mix it now, enjoy it later’ vibe.
Now, for storage: Keep this dirt cake covered tightly in the refrigerator. If you used a large dish, just use plastic wrap pressed lightly against the top layer so the whipped topping doesn’t dry out or pick up fridge smells. Because of the high dairy content (cream cheese, milk, pudding), it shouldn’t sit out for more than two hours at room temperature.
What about emergencies? If you’re in a real pinch, the notes suggested a slight freezer trick. You can chill this in the fridge for about an hour until it’s firming up, and then transfer the whole covered dish to the freezer for about 30 minutes. This gives it an extra boost to set quickly! Just make sure you let it sit on the counter for 10 to 15 minutes after taking it out of the freezer before you try to serve it, so it’s not rock hard. It’s a little hack, but it works when you need that Quick Dessert Idea!
Variations on the Chocolate Pudding Dessert
I know, I know, once you have the perfect Recipe for Dirt Cake, why mess with it? But sometimes, we get tired of the same chocolate-on-chocolate, or maybe we need to shift gears for a specific party theme. Don’t sweat it! This base recipe is so strong that it handles creative swaps like a champ. You can play around with the core elements without losing that amazing, creamy texture we worked so hard to achieve across those Creamy Dirt Cake Layers.
If you want a slightly sweeter, less intense chocolate experience, just swap out the pudding! Like I mentioned before, using vanilla pudding completely changes the vibe. It makes the cream cheese layer pop differently, which is lovely when you want something that feels a little lighter but still super rich. If you need a fantastic recipe for a rich chocolate topping for other things, I highly recommend checking out my guide for easy chocolate frosting!
Think beyond the standard Oreo, too. Have you ever tried using Golden Oreos instead? It creates a beautiful, lighter-colored crumble, which looks fantastic layered up. It gives you a slightly buttery flavor profile instead of that deep cocoa punch. It’s still undeniably an Easy Dirt Cake Dessert, just with a little twist!
For holiday fun, or honestly, just because I love mint, sometimes I add a tiny splash of peppermint extract—maybe just a quarter teaspoon—into the cream cheese mixture right before I fold in the pudding. It turns this into a cool, refreshing treat that tastes amazing when topped with shaved dark chocolate instead of the usual extra Oreos. It’s a fun way to repurpose this classic, nostalgic Oreo Dirt Cake Recipe for different seasons. See? Simple changes make a huge difference!
Frequently Asked Questions About This Recipe
I get so many great questions hitting my inbox about this dessert, and that just proves how much everyone loves a good, easy classic! It’s rewarding to see so many of you making this for your families now. If you’ve ever worried about it being too soft or if you can tweak the formula, I’ve gathered some of the most common queries right here. For more practical advice on simplifying meals, check out how I manage time with my one-pot tuna pasta recipe!
Can I make this a layered dessert in individual cups?
Oh, absolutely! If you are taking this to a big event or serving it at a kid’s birthday party, making individual portions is brilliant. It cuts down on serving time, and everyone gets a perfect, personal portion—especially with those cute worms! Instead of building the layers in one big dish, just assemble it in small, clear cups or mason jars. You follow the exact same layering process: a spoonful of crushed Oreos, followed by a dollop of the creamy mixture, repeat until the cup is full. They look so fun when you garnish them to become perfect little Dirt Cups with Gummy Worms!
What is the best way to crush the Oreos finely?
This is such an important question because the texture of your cookie crumble truly defines the experience of this Sweet and Creamy Dessert. If you want that smooth, satisfying layer that melts in your mouth but still has a little bite, you need a good fine grind. My absolute favorite way is using my food processor—just pulse those Oreos (creams and all!) until they look like fine sand, like dark brown sugar.
If you don’t want to pull out the processor, the old-school rolling pin method works great! Throw the cookies into a sturdy Ziploc bag, push out most of the air, seal it tight, and then just roll over them repeatedly with a heavy rolling pin until you achieve that perfect Oreo Cookie Crumble. Either way, remember to save that cup aside for the top decoration!
I’m worried about the pudding being too runny. How do I prevent that?
I completely understand that anxiety! Nobody wants a soupy mess when they asked for a sliceable No Bake Dirt Cake. The main thing here, and I cannot stress this enough, is using the *instant* pudding mix. Instant pudding is designed to firm up quickly when hit with cold milk and the binder from the cream cheese mixture. If you use cook-and-serve, it needs heat to set, and we aren’t applying any heat here! Also, make sure that milk you use for whisking the pudding is genuinely cold, not just room temperature. That temperature shock is what kicks off the setting process right away.
Can I substitute the butter or use a different topping?
You can definitely try, but you might change the texture. The butter is crucial for that specific richness in the filling that makes this a superior Creamy Dirt Cake Filling compared to recipes that just use pudding and Cool Whip. Sometimes people ask about using margarine, but trust me, stick to real butter for that flavor depth we crave in these Nostalgic No Bake Treats.
As for the topping, we use the final container of whipped topping because it stays light and fluffy, balancing the heavy cream cheese layer underneath. If you want to get fancy, you can use a homemade stabilized whipped cream, but the store-bought stuff, thawed, is perfectly fine and keeps this an Easy Dirt Cake Dessert.
How far in advance can I really make this dessert?
Truthfully? The day before is my sweet spot. I find that after about 24 hours, the cookies start breaking down a little *too* much. While we want them soft, we still want some definition between the layers. If you are making this for a huge event and need 48 hours notice, go ahead, but cover it really well and maybe sprinkle the top cookies on just 30 minutes before serving to keep them crispier.
Nutritional Information Estimate
Okay, let’s talk nutrition, but keep in mind, this is a total indulgence, not a health food! I always preach balance here at Pure Plate Path—we eat well most of the time, which means we can totally enjoy a giant slice of this pure, nostalgic joy guilt-free. If you’re focusing on balancing treats with wholesome eating, remember to check out some of my go-to healthier dessert options for later in the week!
Please remember that because we are using standard brands of Oreos, pudding mixes, and whipped topping, these numbers are just a great estimate. If you use a different cookie or substitute ingredients, these figures will shift, so take this section as a general guide for a standard slice.
Here is the estimated breakdown for one generous serving of this Ultimate No-Bake Oreo Dirt Cake:
- Serving Size: 1 serving (Cut generously!)
- Calories: Approximately 450
- Fat: Right around 28 grams
- Saturated Fat: About 14 grams
- Trans Fat: Maybe half a gram, depending on the butter/topping used.
- Carbohydrates: Roughly 48 grams
- Sugar: A hefty 45 grams (It’s dessert, after all!)
- Protein: About 5 grams
- Cholesterol: Around 55 milligrams
- Sodium: About 350 milligrams
See? Decadent! This is definitely a ‘serve on a special plate’ kind of dessert. It checks every box for being ultra-satisfying, which is why it’s such a powerhouse when you need a quick treat that truly hits the spot. Enjoy it completely!
PrintUltimate No-Bake Oreo Dirt Cake with Gummy Worm Fun

Make this easy, no-bake Oreo Dirt Cake for your next gathering. It features creamy layers of crushed Oreos, chocolate pudding, and a rich cream cheese filling. This dessert is simple to assemble and perfect for parties or potlucks.
- Prep Time: 25 min
- Cook Time: 0 min
- Total Time: 4 hours 25 min
- Yield: 12 servings 1x
- Category: Dessert
- Method: No Bake
- Cuisine: American
- Diet: Vegetarian
Ingredients
- 1 package (14.3 ounces) Oreo cookies, finely crushed
- 1 package (8 ounces) cream cheese, softened
- 1 cup unsalted butter, softened
- 1 cup powdered sugar
- 1 container (12 ounces) frozen whipped topping, thawed
- 2 packages (3.9 ounces each) instant chocolate pudding mix
- 3 cups cold milk
- 1 container (8 ounces) frozen whipped topping, thawed (for topping)
- Gummy worms, for garnish
Instructions
- Place about 1 cup of the crushed Oreo cookies into a separate bowl and set aside for the topping.
- In a large bowl, beat the softened cream cheese, softened butter, and powdered sugar together until the mixture is smooth and creamy.
- Fold in one container of the thawed whipped topping until just combined. This is your cream cheese layer.
- In a separate medium bowl, whisk together the instant chocolate pudding mix and cold milk for about two minutes, or until the mixture begins to thicken.
- Gently fold the thickened chocolate pudding into the cream cheese mixture until fully incorporated.
- In a large trifle dish or 9×13 inch pan, create the first layer by spreading half of the remaining crushed Oreos on the bottom.
- Spread half of the creamy chocolate mixture evenly over the Oreo layer.
- Repeat the layers: spread the remaining crushed Oreos over the cream cheese layer, then top with the remaining chocolate mixture.
- Spread the second container of thawed whipped topping evenly over the top layer.
- Sprinkle the reserved 1 cup of crushed Oreos over the whipped topping to resemble dirt.
- Press gummy worms into the top layer so they appear to be sticking out of the ‘dirt’.
- Cover the dish and chill in the refrigerator for at least 4 hours, or preferably overnight, before serving.
Notes
- For individual servings, assemble this recipe in small clear cups to create fun Dirt Cups with gummy worms.
- If you need a quicker set time, you can chill the dessert for 1 hour, then place it in the freezer for 30 minutes before serving.
- You can substitute vanilla pudding for chocolate pudding if you prefer a lighter cream layer.
Nutrition
- Serving Size: 1 serving
- Calories: 450
- Sugar: 45
- Sodium: 350
- Fat: 28
- Saturated Fat: 14
- Unsaturated Fat: 14
- Trans Fat: 0.5
- Carbohydrates: 48
- Fiber: 2
- Protein: 5
- Cholesterol: 55