
When the holidays roll around, or you just have a gathering that needs a show-stopping main event, nothing beats the tradition of a massive roast. I totally get the pressure—you’re busy, and the last thing you need is an expensive cut of beef turning grey and dry! That’s why I’m sharing my method for the Perfect Herb Crusted Prime Rib Roast. This recipe for a classic rib roast is my secret weapon for guaranteeing edge-to-edge tenderness and that incredible savory crust, keeping those special family traditions doable even when life gets hectic. If my busy schedule allows me to nail this centerpiece, I promise you can too! For pairing ideas later, check out my tips for the best fall-apart tender pot roast gravy.
- Why This Herb Crusted rib roast is Your New Holiday Roast Centerpiece
- Gathering Ingredients for Your Perfect rib roast
- Essential Equipment for a Successful rib roast
- Tender Roast Beef Steps: How to Prepare the rib roast
- Foolproof Oven Method: Cooking Your rib roast to Perfection
- The Critical Resting Period for Your rib roast
- Tips for Success When Making a Standing rib roast Guide
- Serving Suggestions for Your Impressive Beef Dinner
- Frequently Asked Questions About Your rib roast
Why This Herb Crusted rib roast is Your New Holiday Roast Centerpiece
Look, cooking a big cut of beef can be terrifying, but this method turns the whole process into something straightforward. We aren’t guessing here; we are relying on science and great flavor combinations! That herb butter melts down right into the surface fat, creating a flavor crust you won’t believe. It truly delivers on flavor and texture without being complicated.
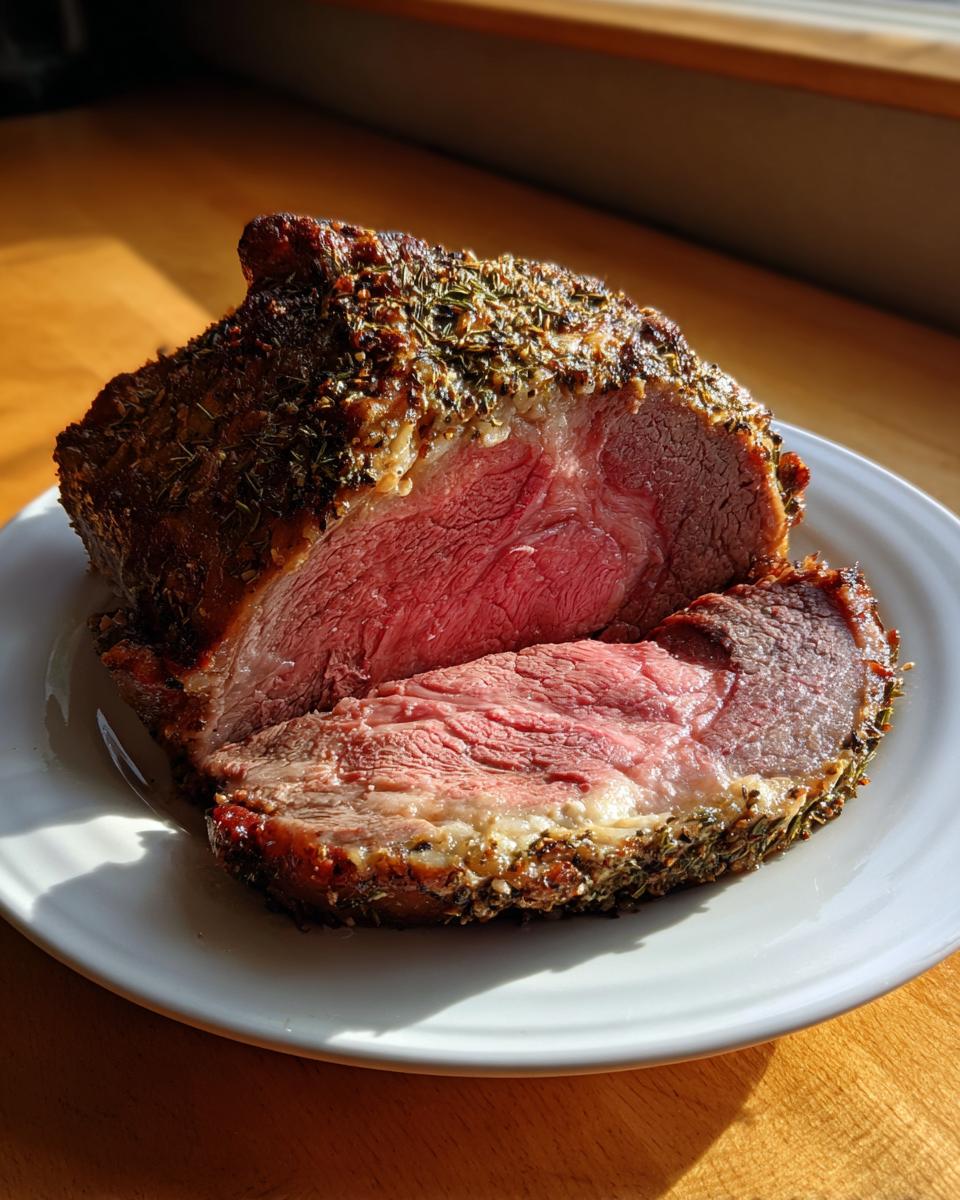
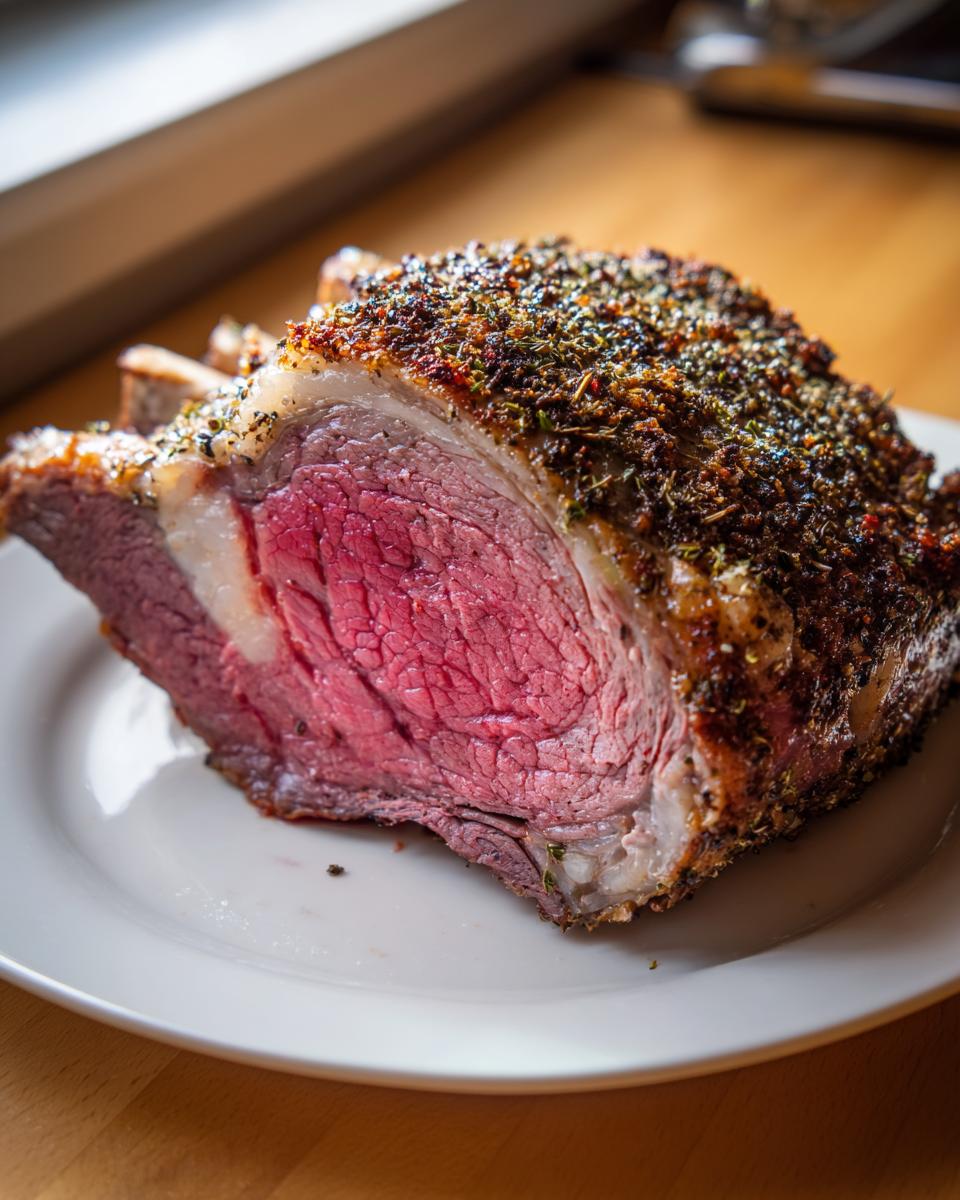
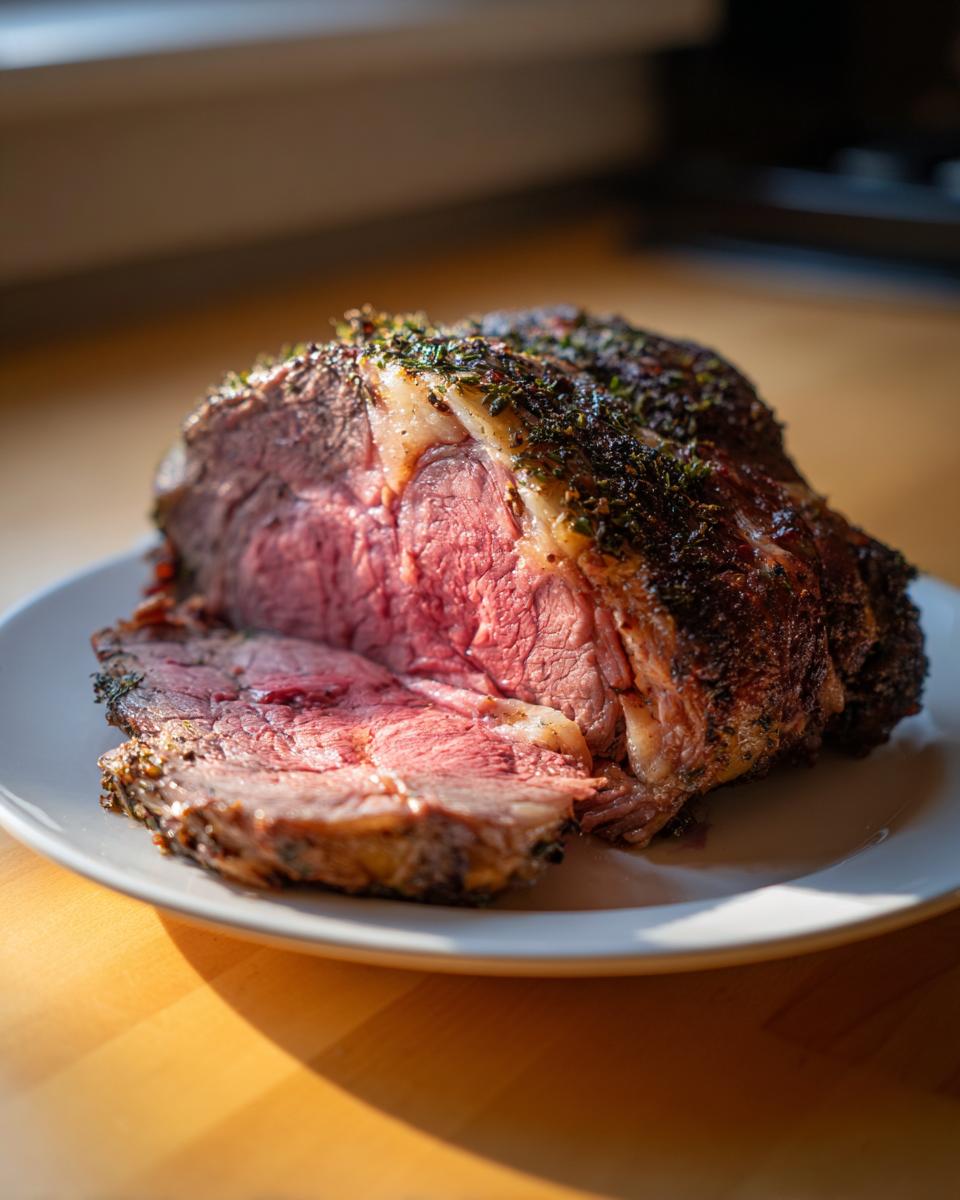
- No More Grey Band: We manage the heat so the interior is pink and lovely from edge to edge, not just in the center.
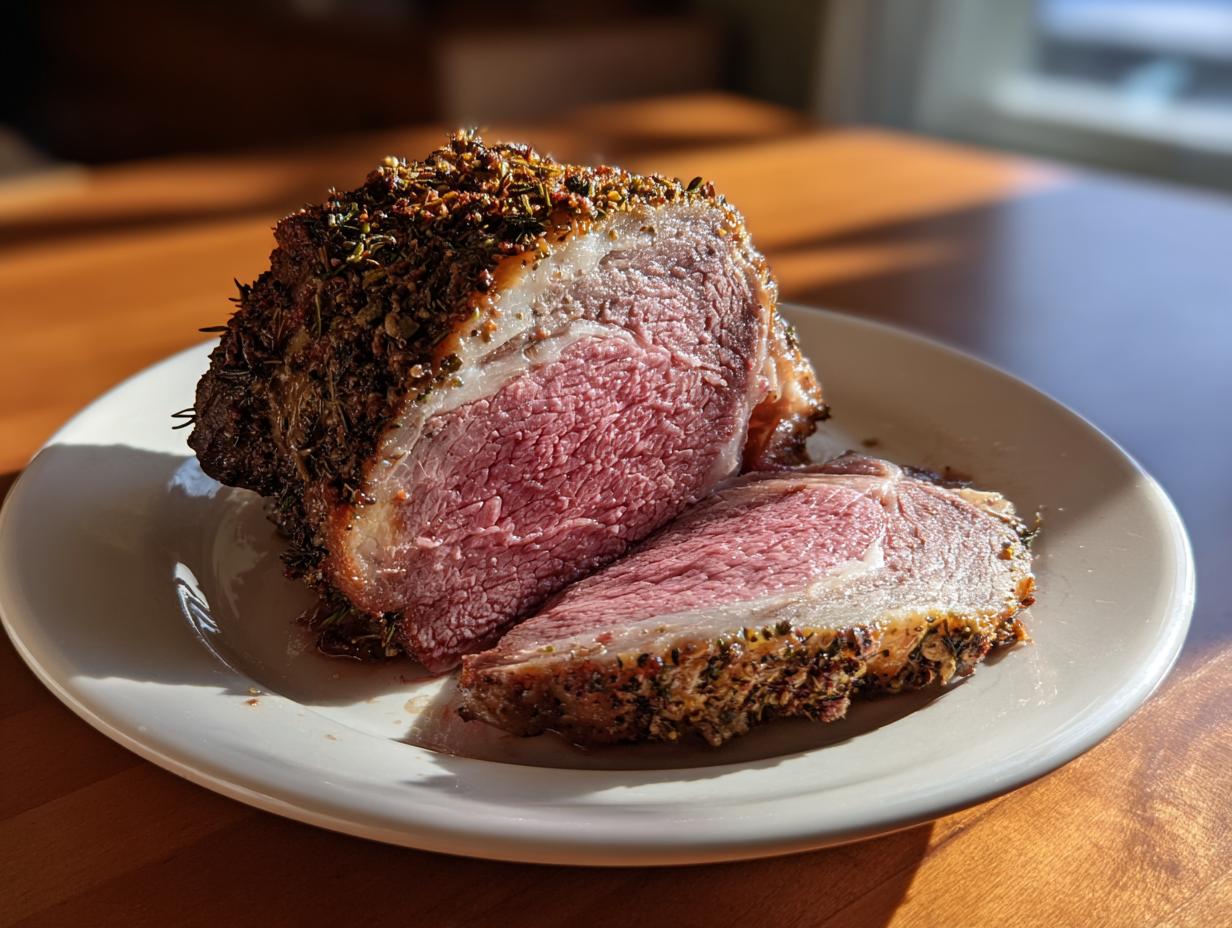
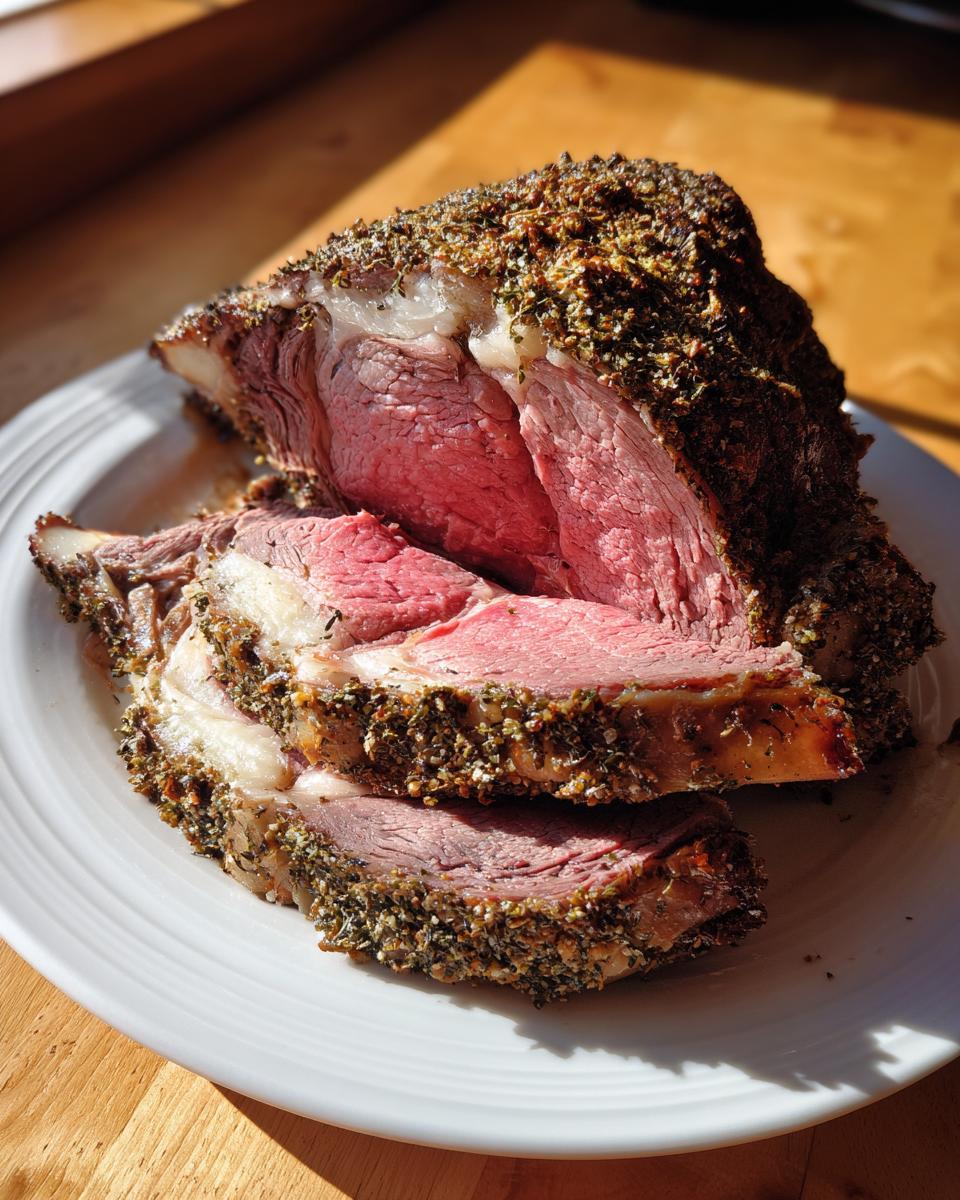
- Killer Crust: The combination of salt, pepper, and herbs creates that savory ‘bark’ everyone fights over.
- Totally Accessible: Even if you usually stick to weeknight chicken, you can nail this rib roast without stress.
If you’re looking for a healthy side to go with this amazing meat, try my recipe for perfect fluffy cauliflower rice!
Achieving the Best rib roast Temperature Every Time
Here’s the real secret to getting that perfect medium-rare, juicy result: the thermometer is your best friend. Forget the old ‘poke it with your finger’ stuff when you’re cooking something this special. You have to trust the science!
For a stunning medium-rare, you want to pull it when your thermometer reads 125°F. Don’t panic when you see that number! That rest time afterwards is when the magic happens, allowing the internal temperature to creep up to the perfect serving temp of around 130–135°F. It’s this precise monitoring that makes sure your expensive rib roast is tender perfection.
Gathering Ingredients for Your Perfect rib roast
Okay, gathering supplies is almost as fun as eating the final product, right? When you’re cooking a big cut like this, you have to treat the ingredients with respect. Quality really matters here because there aren’t a ton of things masking the beef flavor!
I’ve listed everything you need below. Pay close attention to the butter—it has to be really soft, not melted, or your rub won’t spread properly. Also, don’t skimp on the kosher salt; that coarse texture is what helps build that amazing outer crust on your rib roast.
- Two to three ribs of standing rib roast (Prime Rib), about 5 to 7 pounds total. Get this from your butcher if you can!
- Three tablespoons of coarse kosher salt — no table salt substitute here, please!
- Two tablespoons of freshly ground black pepper. Grind it right before you use it if you have the grinder!
- One tablespoon of dried thyme.
- One tablespoon of dried rosemary.
- Four cloves of garlic, minced very finely.
- One half cup of unsalted butter, which you absolutely must let soften on the counter for at least an hour.
- Two tablespoons of olive oil.
- One teaspoon of onion powder.
- One teaspoon of garlic powder.
- One half cup of beef broth to sit in the bottom of the pan—this stops the drippings from scorching!
Having these ready to go makes the actual cooking process so much smoother. Once everything is laid out, you can whip up the herb butter in about two minutes flat. And speaking of great appetizers while people wait, you HAVE to try my caramelized onion dip recipe!
Essential Equipment for a Successful rib roast
Okay, before we even think about turning on the oven, let’s talk gear. You might think a big piece of beef just needs a baking dish, but trust me, having the right tools makes the difference between a gorgeous centerpiece and a total disaster sitting in its own juices. Since this is an expensive cut of meat, this is not the place to cut corners!
Here is the bare minimum you need to pull this off beautifully. If you have these things, you are already halfway there, regardless of your skill level:
- A Sturdy Roasting Pan: You need something deep to catch all those wonderful drippings. If your pan is too shallow, the drippings will smoke and burn, giving you a bitter flavor. A broiler pan usually works, but aim for something with higher sides if you can find it.
- A Reliable Roasting Rack: This lifts the meat up out of the drippings. If the bottom of your meat is sitting in hot liquid the entire time, it steams instead of roasts, and you lose that beautiful surface texture all around. The rack lets the heat circulate underneath.
- A Digital Meat Thermometer: Seriously, this is the MVP. I cannot stress this enough! You can use one that stays in the meat while it cooks, or one you can easily insert and pull out to check temps in different spots. Getting that internal temperature right is the single most important step for a juicy result.
If you’re feeling ambitious and want to make tiny, adorable versions of centerpiece meals later, you should check out my recipe for mini meatloaf muffins! But for now, gather these essentials!
Tender Roast Beef Steps: How to Prepare the rib roast
Now we move into the active prep! Getting this piece of beef ready properly before it hits the high oven heat is what separates a good roast from a truly unforgettable one. My first absolute rule for this rib roast is patience with the chilling process. You need to take it out of the fridge about two to three hours ahead of time so it can relax and come up towards room temperature—we call this tempering. If it goes straight from the cold fridge to the hot oven, you’re guaranteed that dreaded grey band!
Once it’s warmed up a bit, you MUST pat the roast absolutely bone-dry using paper towels. Moisture on the surface creates steam, and steam prevents that gorgeous, crusty sear we are aiming for. Season it heavily everywhere with your salt and pepper mixture. It looks like a lot, but trust me, this cut can handle it!
When you’re ready for the herb mixture, you’ll find the perfect accompaniments using my recipe for best creamy fluffy mashed potatoes. Seriously, your guests will thank you.
Making the Savory Garlic Herb Butter rub for Your rib roast
This butter is the flavor foundation! Grab a mixing bowl and just toss everything in: the softened butter, your minced garlic, olive oil, and all those dried herbs and powders. You want to mix this vigorously until it’s one uniform, spreadable paste. If your butter is too hard, you’ll end up ripping the dry surface of the meat trying to spread cold clumps around.
The secret to getting the perfect spread is slightly soft butter—it should give easily when you press it, but it shouldn’t look oily or melted in the bowl. Once it’s mixed, grab your spatula and rub that glorious herb butter evenly over the entire surface of the rib roast. Don’t miss the ends! If you want to see a great technique for applying a savory crust to meat, check out this great herb crusted ribeye roast recipe!
Foolproof Oven Method: Cooking Your rib roast to Perfection
Alright, this two-step roasting process is what keeps this rib roast from drying out. It gives us that crisp exterior we love while keeping the inside beautifully pink and tender. First, get your oven hot to 450°F—preheat it completely! We need serious heat right away to shock the outside of the meat and lock in those juices we worked so hard to keep.
Place that herb-crusted roast onto the rack in your pan. Roast it hard at 450°F for exactly 15 minutes. Don’t peek! After those 15 minutes are up, you are going to perform the most important transition: reduce the heat immediately down to 325°F. I know, it feels drastic, but this lower, steady heat is what cooks the center perfectly without overcooking the edges.
Now it just roasts until it hits that magic number on the thermometer. While this cooks, I usually get going on something comforting, like my easy stovetop beef noodle soup, just to keep my mind off the oven!
Monitoring the Best rib roast Temperature for Medium Rare
Listen, if you skip the thermometer, you’re basically gambling with a very expensive piece of meat. Don’t do it! You need to insert that reliable digital probe right into the thickest part of the roast, making sure you aren’t touching any bone, since the bone heats up differently. That’s how we guarantee a truly juicy result.
For that gorgeous medium-rare finish—which is truly the best way to enjoy this cut—you need to pull the rib roast out of the oven when your thermometer reads 125°F. I know it seems low, but trust me on this carryover cooking! It will gain another 5 to 10 degrees while it rests, landing you perfectly in that sweet spot. For more expert timing advice, you can always check out methods like the one discussed on Perfect Prime Rib Roast (Oven Method)!
The Critical Resting Period for Your rib roast
Okay, you’ve pulled this magnificent piece of beef out of the oven, and it smells like heaven. Your instinct will be to saw into it right away, perhaps because you’re starving or maybe just because you can’t wait to admire your handiwork. Stop! Don’t move that roast for anything!
Resting is not optional; it’s the final, most important cooking step for any big cut of meat. When meat cooks, the muscle fibers tense up and squeeze all those beautiful juices right toward the center. If you carve it immediately, all that moisture rushes out onto your cutting board, leaving you with dry meat.
When you let it rest, those fibers relax, and the juices redistribute themselves evenly throughout the roast. This is what gives you that even juiciness from the outside edge to the dead center. I always cover the roast loosely with aluminum foil—I call it ‘tenting’—just to keep the herb crust from getting soggy while it rests. You need a minimum of 20 minutes for a roast this size. If you can wait 30, even better! Patience pays off tenfold here.
While that roast is relaxing, you can use the time to whip up something sweet, like my super easy homemade caramel sauce recipe—it’s fantastic drizzled over vanilla ice cream after a huge meat feast!
Tips for Success When Making a Standing rib roast Guide
Even with the best instructions, sometimes you want that little extra reassurance when tackling a big holiday centerpiece like this rib roast. Since I’ve cooked this maybe a hundred times now, I’ve picked up a few tricks that I insist you try. These aren’t strict rules, but they absolutely help elevate your final product from ‘good’ to ‘I need the recipe immediately!’ material.
First, let’s talk about the thermometer tip again because it’s that crucial for a standing rib roast guide. You have to trust the machine over the clock. Every single oven runs differently, and every roast is shaped slightly differently. Insert that thermometer correctly into the thickest part, and when it beeps at 125°F, take it out—that’s your golden ticket to medium-rare.
My second pro-tip is for tackling that dreaded grey band, especially if you’re using a slightly thicker roast. While I love the quick sear method, if you have a lot of time, try the low-and-slow approach (which is detailed in the notes section of the full recipe). You start the oven way down low, around 250°F, until the internal temp is about 10 to 15 degrees below your target temp. Then, crank it up to 450°F for the last 10 minutes to crisp up that herb crust. It takes longer, sure, but it guarantees uniform color!
And hey, speaking of things that are easy to make when company is coming, you should check out my quick recipe for easy soda bread—it goes so well with savory recipes!
If you want to see how other experts handle their large cuts, I always peek at resources like the guide from Effortless Oven Prime Rib Roast just to keep my own skills sharp. You want that foolproof method, and sometimes seeing another approach helps solidify your own confidence!
Serving Suggestions for Your Impressive Beef Dinner
You’ve done the hard work, your roast is perfectly rested, and now it’s time for the supporting cast! Serving a magnificent roast like this isn’t just about the meat; it’s about creating a whole plate experience. What you serve alongside can really make the whole meal sing! Since this is such a rich, savory star of the show, you want sides that are either equally comforting or bright enough to cut through that richness.
My absolute go-to pairing, without fail, is potatoes. You simply need something starchy and decadent to soak up any residual juices or gravy! For me, nothing beats a classic comfort food side. If you’re already planning on making gravy from the drippings, you HAVE to try my recipe for easy twice-baked potatoes. They feel fancy but are honestly so simple to prep ahead of time, which is essential when you’re managing a big roast.
Don’t forget your greens! A simple burst of color and freshness is needed to balance things out. Think roasted asparagus tossed with a little lemon zest, perfectly steamed green beans, or maybe some roasted Brussels sprouts with balsamic vinegar. The slight acidity in those accompaniments wakes up your palate between those rich, savory bites of beef.
And of course, the pan drippings! Don’t waste a single drop. Those juices at the bottom of your roasting pan are pure gold. If you followed my advice and added a little beef broth before roasting, you have the perfect base for a beautiful pan gravy. Making a quick gravy on the stovetop while the meat rests is non-negotiable for me—it ties the whole plate together, especially when spooned over the potatoes!
Frequently Asked Questions About Your rib roast
It’s totally normal to have a few last-minute jitters when you’re dealing with a roast this big and beautiful! I always found myself wondering things right before I stuck it in the oven. So, I wanted to tackle a few of the most common things people ask me about cooking their rib roast so you can feel totally confident.
What is the difference between a rib roast and prime rib?
Oh, this gets confusing fast! Honestly, in most butcher shops these days, there isn’t a real difference, which is why you see so many terms floating around. A standing rib roast is the specific cut of meat that comes from the primal rib section of the cow. Prime rib just refers to the *quality grade*—Prime, Choice, or Select. If your recipe calls for Prime Rib Roast, you are getting the best quality meat from that specific cut (the rib roast).
So, simplified? If it’s a standing roast cut from the rib section, it’s a rib roast! If it’s also graded ‘Prime’ quality by the USDA, then it’s both! Most of what we buy and cook for a holiday roast centerpiece falls into the ‘Choice’ grade, but it’s all essentially the same roast cut.
How do I store leftover rib roast?
First off, if you have leftovers, congratulations, you did great! This roast reheats wonderfully as leftovers, especially for a quick lunch the next day. The absolute key is moisture retention, so you have to seal it tight.
Here’s what I do: Once the meat has cooled completely, I slice the leftovers thinly against the grain. Then, I pack those slices into an airtight container. You can add a tiny splash of beef broth or water to the container before sealing, but don’t drench it! This keeps the meat from drying out in the fridge. It should stay good and delicious for about three to four days. When you want to eat it, just warm it *very* gently—think low heat in a skillet with a touch of butter, not microwaving!
What if I prefer my beef well-done?
Well, I might shed a tiny tear for you, but I won’t judge! If you truly prefer a well-done roast beef, you absolutely can cook it longer. Just remember that the higher the temperature you cook to, the less tender the meat will be. You must check the temperature! Instead of pulling it at 125°F, you’ll want to keep it in the 325°F oven until it reads around 155°F to 160°F. And honestly, after reaching that high, you’ll need to rest it for a solid 30 minutes!
If you have any questions about the process and need to reach out directly, you can always find me through the contact page!
PrintFoolproof Herb Crusted Prime Rib Roast for a Juicy Centerpiece
Learn the simple, step-by-step oven method to cook a standing rib roast that stays incredibly juicy and tender. This recipe features a savory herb and garlic butter rub for a perfect, flavorful crust every time, making it the ideal holiday roast centerpiece.
- Prep Time: 20 min
- Cook Time: 1 hr 45 min
- Total Time: 2 hr 35 min
- Yield: 6 servings 1x
- Category: Main Course
- Method: Oven Roasting
- Cuisine: American
- Diet: Low Fat
Ingredients
- 1 (5-7 lb) standing rib roast (prime rib), 2-3 ribs
- 3 tablespoons coarse kosher salt
- 2 tablespoons freshly ground black pepper
- 1 tablespoon dried thyme
- 1 tablespoon dried rosemary
- 4 cloves garlic, minced
- 1/2 cup unsalted butter, softened
- 2 tablespoons olive oil
- 1 teaspoon onion powder
- 1 teaspoon garlic powder
- 1/2 cup beef broth (for the pan)
Instructions
- Remove the rib roast from the refrigerator 2 to 3 hours before cooking. Let it sit at room temperature. Preheat your oven to 450°F (232°C).
- Prepare the herb butter rub: In a small bowl, combine the softened butter, minced garlic, olive oil, dried thyme, dried rosemary, onion powder, and garlic powder. Mix until you have a uniform paste.
- Pat the entire surface of the rib roast dry with paper towels. Season generously all over with the kosher salt and black pepper.
- Spread the herb butter mixture evenly over the entire surface of the roast.
- Place the roast, fat-side up, on a roasting rack set inside a sturdy roasting pan. Pour the beef broth into the bottom of the pan (this helps keep the drippings from burning).
- Sear the roast: Place the pan in the preheated 450°F oven and roast for 15 minutes.
- Reduce the oven temperature to 325°F (163°C). Continue roasting until the internal temperature reaches your desired doneness. Use a meat thermometer inserted into the thickest part of the meat, avoiding bone.
- For medium-rare (recommended), remove the roast when the internal temperature reads 125°F (52°C).
- Remove the roast from the oven. Tent it loosely with aluminum foil and let it rest on a cutting board for at least 20 minutes before carving. The temperature will rise during resting.
- Carve the roast between the bones and serve immediately. Use the pan drippings to make a simple gravy if desired.
Notes
- Use a reliable meat thermometer; this is the key to a juicy roast beef.
- For an even cook, consider using the low-and-slow method: start at 250°F (121°C) until 10-15 degrees below target, then blast at 450°F (232°C) for 10 minutes to form the crust.
- If your roast has a fat cap, score it lightly in a crosshatch pattern before applying the rub.
Nutrition
- Serving Size: 6 oz cooked meat
- Calories: 450
- Sugar: 0
- Sodium: 450
- Fat: 30
- Saturated Fat: 14
- Unsaturated Fat: 16
- Trans Fat: 1
- Carbohydrates: 0
- Fiber: 0
- Protein: 42
- Cholesterol: 150