
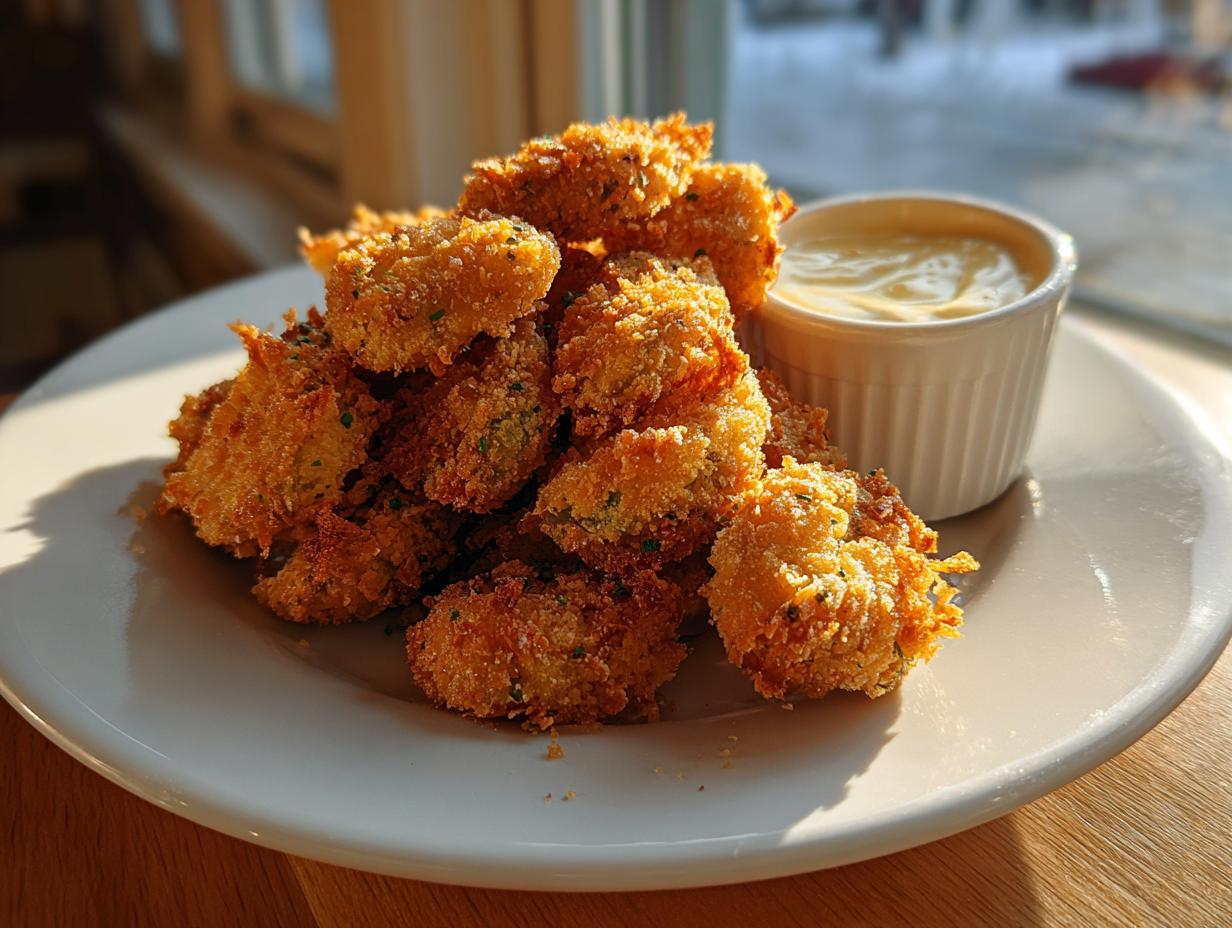
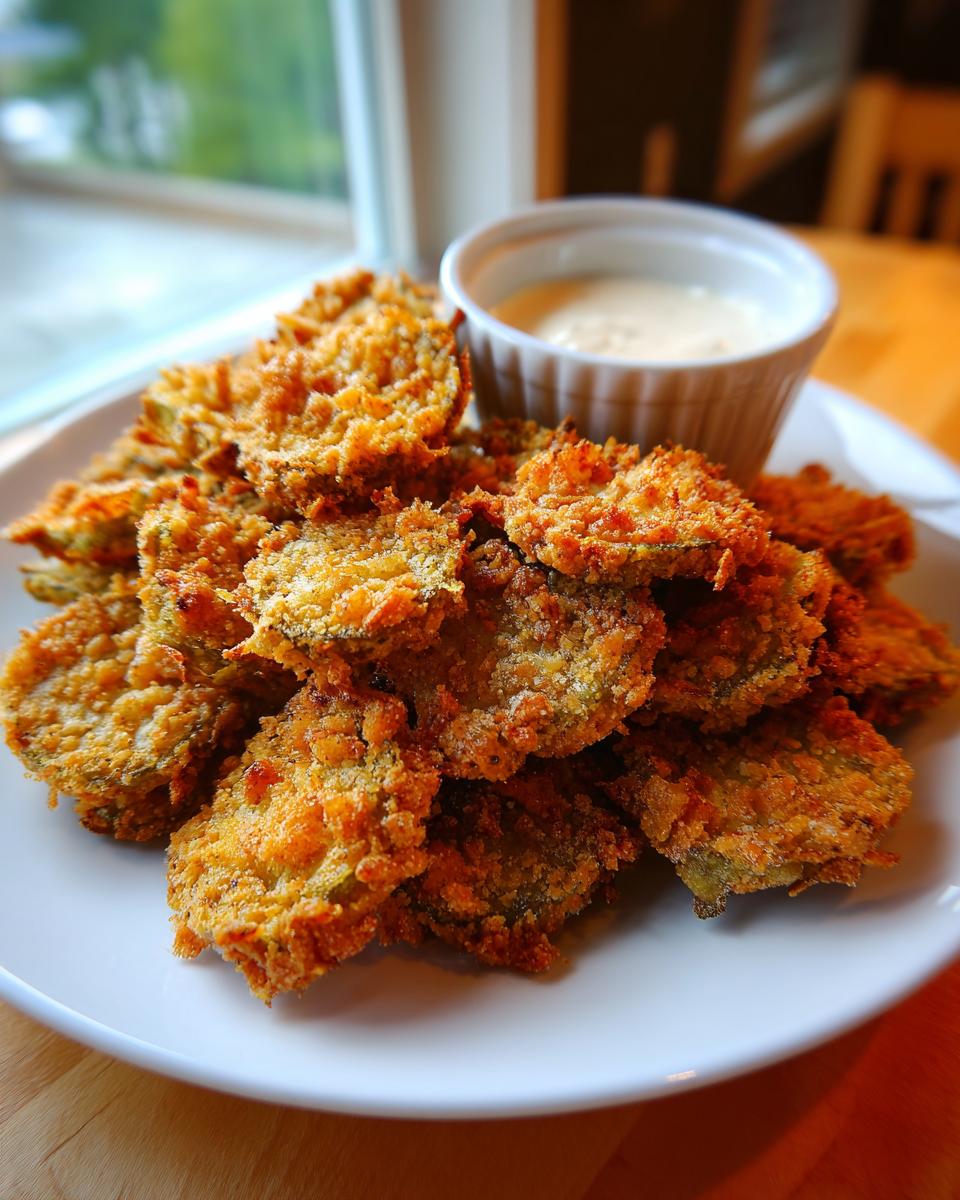
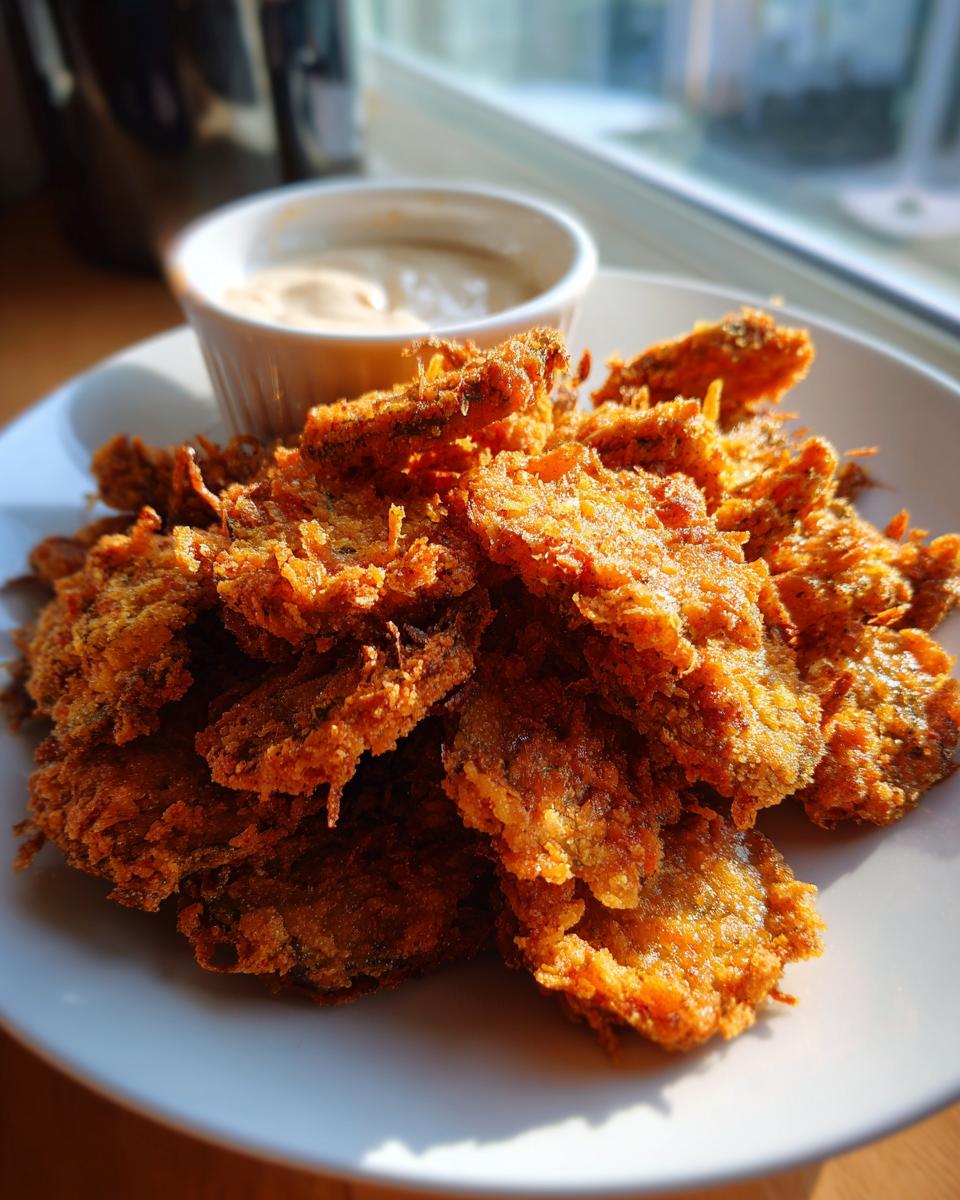
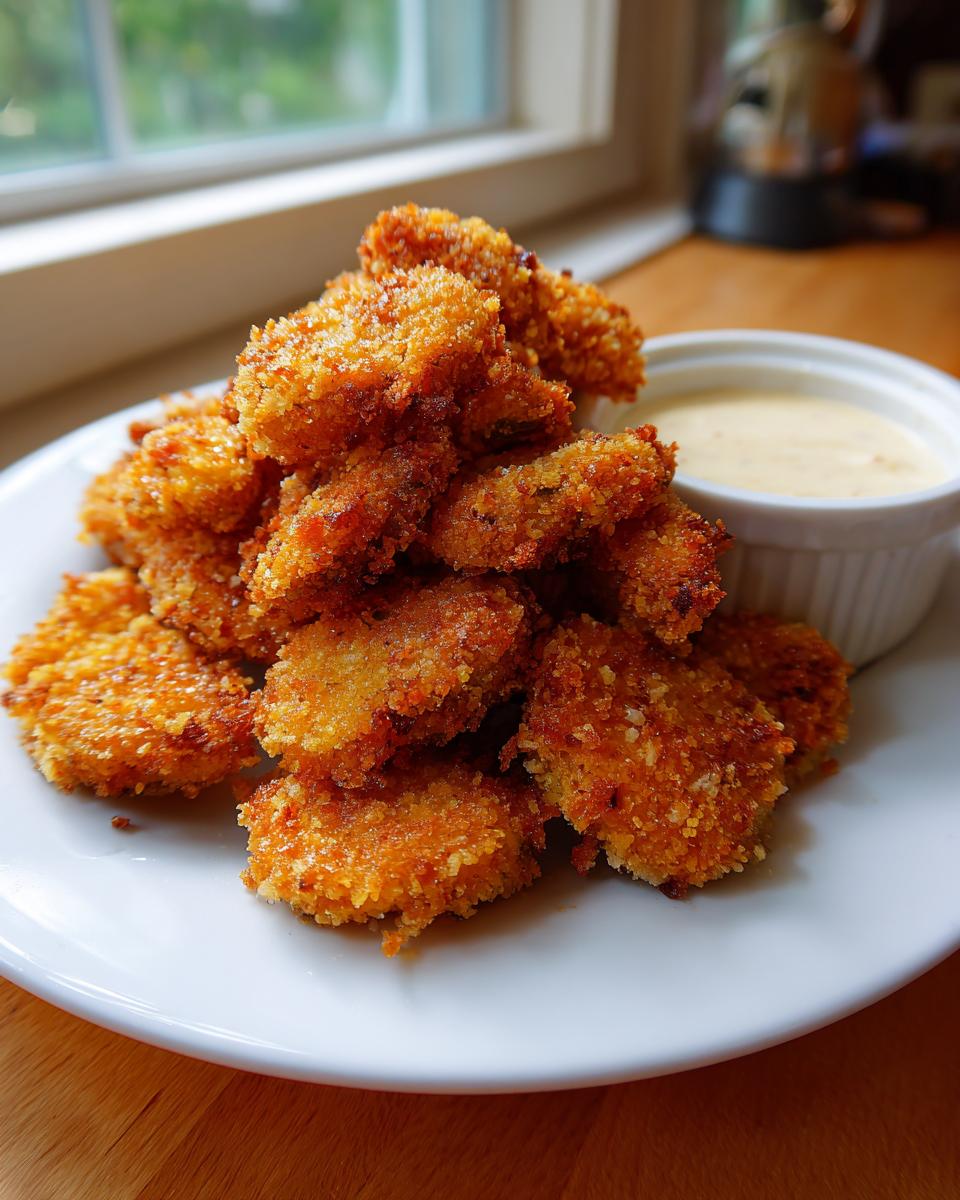
Do you ever just get that intense craving for something salty, tangy, and unbelievably crunchy? I know I do! Back when I was running myself ragged in marketing, quick, satisfying bites were essential. That’s why finding—and perfecting—the ultimate easy appetizer became a mission of mine. Friends, I’m handing you the blueprint for the absolute best Fried Pickles you will ever make at home. Seriously, we’re talking about golden, tangy crunch in under 30 minutes total! Forget soggy disappointments; this recipe delivers that restaurant-quality crispiness that makes them perfect for Game Day or any time you need a celebratory snack. It’s proof that my journey back to real food means creating simple yet deeply satisfying food, like these amazing Fried Pickles. And hey, if you’re planning a spread, make sure you check out my recipe for caramelized onion dip—it’s the perfect partner for these crunchy bites!
- Why This Crispy Fried Pickles Recipe Works So Well
- Gathering Ingredients for Perfect Fried Pickles
- How to Prepare Your Easy Fried Pickle Appetizer
- Variations: Air Fryer Fried Pickles and Fritters
- Making Texas Roadhouse Fried Pickles Copycat Seasoning
- Tips for Game Day Fried Pickles Success
- Storage and Reheating Instructions for Fried Pickles
- Frequently Asked Questions About Fried Pickles
- Share Your Best Fried Pickles Creations
Why This Crispy Fried Pickles Recipe Works So Well
I get it; you want that perfect, almost shattering crunch when you bite into one of these, right? That’s why I spent time tweaking the dredging process. This isn’t just another recipe slapped together; this is designed for pure, unadulterated crunch. Plus, since it comes together in about 25 minutes total, it’s our go-to for last-minute snacks when guests show up!
We focus on making food that truly serves you, which means incredible flavor without wasting your whole evening in the kitchen. If you’re looking for more quick ideas for those busy nights, check out how I manage my quick and easy weeknight dinners!
The Secret to Truly Crispy Fried Pickles
Crispiness in a fried appetizer comes down to two things: removing water and maximizing surface area. You absolutely cannot skip the drying step. If those pickle chips are wet when they hit the flour, you’re guaranteeing a soggy disaster.
- Bone Dry is Best: You must pat those dill slices until they feel almost dusty dry. Seriously, press hard!
- Panko Power: We use Panko breadcrumbs here. They are flakier than regular breadcrumbs and create those wonderful spiky peaks of crunch when they hit the heat.
- Oil Temperature Stability: Make sure your oil is at a steady 375°F. If it’s too cool, the coating soaks up grease instead of crisping instantly.
Gathering Ingredients for Perfect Fried Pickles
Okay, the secret weapon for getting that intense crunch we talked about relies heavily on using the right stuff. Don’t try to substitute when it comes to the breading—that’s where the magic happens! I always make sure to have my Panko out and ready because that’s what gives us that incredible texture. Also, don’t forget the dipping sauce; a good sauce is what takes this appetizer from great to legendary!
Having everything measured out and ready before the oil starts heating up makes this truly a quick snack. Once you see how easy this setup is, you’ll use this three-stage dipping method for everything!
Ingredients for the Tangy Crunchy Snack
- 2 cups dill pickle chips or spears
- 1 cup all-purpose flour
- 1 teaspoon salt
- 1 teaspoon black pepper
- 1 teaspoon paprika
- 1/2 teaspoon garlic powder
- 1/4 teaspoon cayenne pepper (just a little kick!)
- 1 large egg
- 1/2 cup milk
- 1 cup panko breadcrumbs (for extra crispiness)
- Vegetable oil, for frying
Simple Fried Pickle Dipping Sauce Components
This sauce is so much better than store-bought ranch, and it takes two seconds!
- 1/2 cup mayonnaise
- 1/4 cup sour cream
- 1 tablespoon hot sauce
- 1 teaspoon dried dill
How to Prepare Your Easy Fried Pickle Appetizer
Getting these appetizers on the table piping hot and crunchy is totally doable, even if you’re busy! I learned early on that organization is everything in the kitchen, especially when you’re dealing with something that cooks as fast as these appetizers do. We need to move through the steps efficiently, but never rush the crucial coating part. Remember, that beautiful, thick crust doesn’t happen by accident!
We have three main stages here: the prep work (drying), the assembly line (dredging), and the quick trip to the hot oil. Having your dipping sauce ready while the oil heats up keeps us right on track for that 25-minute total time goal. If you need an amazing chocolate finish to a meal after all this savory goodness, you have to try my easy gooey hot fudge pie sometime!
Prepping Pickles and Setting Up the Breading Stations
This is where the crunch factor is won or lost, so listen up! Take your drained pickles—spears or chips, it doesn’t matter—and lay them out on a stack of paper towels. You need to blot them until they feel dry to the touch. I mean, really press down; moisture is the enemy of crispiness! Once they are dry, start setting up your stations in a row:
- Dish 1: The seasoned flour mix.
- Dish 2: The egg and milk wash.
- Dish 3: The Panko breadcrumbs.
Make sure you have your large pot or fryer warmed up with oil so it hits 375°F while you work on the assembly line. Patience in this drying step pays off huge later!
Dredging Technique for Perfect Fried Pickles
Now we build the crust! This must be done in order to get the best coating on your Fried Pickles. You’re going to take one dry pickle at a time and move it through the line methodically.
- First, toss it gently in the flour mix. Make sure it’s fully covered, then shake off any excess flour that’s just hanging loose.
- Next, dip it completely into the egg mixture. Let that extra liquid drip off back into the bowl.
- Finally, move it right into the Panko. This is important: press the Panko crumbs onto the pickle gently but firmly all over. You want a nice, complete layer that really sticks.
Set the fully coated pickle on a clean plate while you finish the rest. Don’t let them sit too long, or the coating might start getting damp again!
Deep Frying Your Homemade Fried Pickles
Time for the sizzle! Gently lower small batches of your coated pickles into that 375°F oil. Don’t be tempted to overcrowd the pot, or the oil temperature will plummet, and you’ll end up with greasy, soft pickles instead of a Tangy Crunchy Snack. Keep an eye on them!
They cook fast—I’m talking 1 to 2 minutes per side. You are looking for that beautiful, deep golden brown color. Use a slotted spoon to lift them straight out and immediately place them on a wire rack lined with paper towels to drain. This lets air circulate underneath so the bottom doesn’t steam itself soggy. Get them out fast, drain them well, and serve them right away!
Variations: Air Fryer Fried Pickles and Fritters
I totally get it. Sometimes the deep fryer just isn’t practical, or maybe you’re just looking to cut back a little without sacrificing that satisfying crunch. That’s why I love having a great backup method for making Fried Pickles. My notes included a little secret for making these in the air fryer, and honestly? They come out nearly as good, which is amazing for something called a Healthy Fried Pickles Alternative!
If you’re hosting a big crowd for a game day, you might also want to think about making Fried Pickle Fritters instead of individual pickles. They’re a bit easier to manage when you’re serving a huge platter, and they let people scoop up that amazing dipping sauce we mixed up earlier. I found a great guide on how to fry pickles differently over at Chasety if you want to see another take on the classic deep-fried method!
Regardless of how you cook them, these are still the snappy, tangy appetizer everyone wants!
Making Texas Roadhouse Fried Pickles Copycat Seasoning
You know how some restaurant appetizers just have that *zing* that you can’t quite place? If you’ve ever craved those famous tangy, crunchy spears from the big Texas-style chain, I’ve got good news. The reason this recipe works so well as a copycat is all thanks to that seasoning blend we put together in the flour dredge! It really nails that savory, slightly smoky profile they are famous for.
If you look closely at the ingredients list—the paprika, the garlic powder, and especially that pinch of cayenne—that’s the secret sauce mimicking their signature flavor. We aren’t messing around with exotic spices here; we’re using simple pantry staples to build big, bold flavor. It shows you that using quality, familiar ingredients in the right balance is what creates that restaurant magic right in your own home.
It’s all about getting the ratios right to enhance the dill flavor without taking over. It truly makes the experience of eating this appetizer so much more exciting. For another simple dip idea that pairs well with seasoned snacks, take a peek at my recipe for easy 3-ingredient chili cheese dip!
If you want to see a recipe detailing that chain’s exact presentation, RecipeStang has a great breakdown for the Texas Roadhouse Fried Pickles Copycat that you might want to check out for comparison!
Tips for Game Day Fried Pickles Success
When you’re making a batch of Fried Pickles for a party or game day, the biggest hurdle is timing. Nobody wants to eat lukewarm or soggy appetizers while everyone else is cheering! Because these cook so quickly, the absolute best approach is to treat them like French fries—make them just moments before you serve them.
Since the entire frying process takes maybe 15 minutes total, it’s much better to fry in smaller batches throughout the event than to try and keep a big batch warm. If you absolutely have to hold them for a few minutes (say, while you finish the dipping sauce), lay them out on a wire rack set over a baking sheet in a very low oven—around 200°F. This keeps them from steaming against a plate!
This is truly the definition of a perfect Party Appetizer Idea because they are finger food perfection. The combination of the tangy dill and that heavy, crispy coating is just addictive!
For tips on how other folks manage their game day spreads and keep things moving quickly, I love checking out advice like this from Flavor Made on their Crispy Fried Pickles Easy Game Day Appetizer guide. Managing the flow is half the battle when hosting!
Storage and Reheating Instructions for Fried Pickles
So, you made a giant batch because, well, who can stop at just a few? Trust me, I’ve been there! The good news is that leftovers are manageable, but you have to treat them right. If you try to save them in an airtight container while they are still warm, you are locking in steam, and that steam will destroy the crispiness we worked so hard to achieve.
For the best results, let any leftovers cool to room temperature first. Then, store them in a paper bag or a loosely covered container in the fridge. They should hold up okay for a day or maybe two, but honestly, these are best eaten the day you make them!
When you’re ready to bring them back to life—which you absolutely should do—scrap the microwave! The microwave turns crispy things soft instantly, and we want to avoid that sad, soggy texture at all costs. Focus on methods that use dry, intense heat, just like the original cooking process.
For your reheating game plan, I always rely on the oven or the air fryer. If you want that perfect snap back, I highly recommend running a test batch first. If you’re making potato croquettes later in the week, the storage principles are the same—dry heat is your friend!
- Oven Method: Preheat your oven to about 400°F. Lay the cooled, leftover pieces in a single layer on a wire rack set over a baking sheet. This allows air to circulate underneath. Bake for about 5 to 8 minutes. Check them closely—they heat up fast!
- Air Fryer Method: If you still have your air fryer handy from the alternative batch we talked about, use it! Set it to 375°F and cook for just 3 to 5 minutes, tossing gently halfway through. This seems to give the absolute best results for reviving that crunch!
Enjoy those tasty leftovers—they’ll taste almost brand new!
Frequently Asked Questions About Fried Pickles
I always get questions when people try this recipe because they are so much better than what they expect! That’s what happens when you nail the technique, right? I’ve gathered the most common things people ask me when diving into making this super satisfying snack. Hopefully, this helps you get started stress-free!
If you’re looking for something lighter after all this deep-fried deliciousness, I always default back to my collection of fresh salad recipes to balance things out, but let’s tackle these pickle questions first!
Can I use sweet pickles instead of dill for Fried Pickles?
Oh, you absolutely *can*, but you’re going to get a totally different experience. Dill pickles have that beautiful, bracing sourness and saltiness that cuts right through the richness of the batter and the oil. Sweet pickles are, well, sweet! If you use them, you’ll end up with a very sweet, tangy fried item, more like a dessert treat than the classic savory appetizer. I personally stick to dill because I love that sharp flavor contrast—it makes them so addictive!
What is the best oil temperature for making these crispy Fried Pickles?
Temperature control is genuinely crucial here for getting that beautiful, golden crust rather than a greasy mess. We are aiming for a steady 375°F (190°C). If your oil is too low, the batter soaks up the fat before it can set and crisp up, making your Fried Pickles heavy and oily. If it’s too high, the outside burns before the inside even has a chance to heat through. Using a thermometer to keep that temperature constant is the secret ingredient to that perfect, light crunch!
How can I make this a Quick 30 Minute Snack from start to finish?
You totally can! The recipe is already timed out to be about 25 minutes total, which puts us well within that Quick 30 Minute Snack window! The trick is working in parallel. While you are patting the pickles dry (which takes about 5 minutes), you should have your oil heating up. Then, while you set up your stations and coat the first few small batches, the oil should be hitting that perfect temperature. Fry quickly, drain, and you’re serving them before you know it!
Share Your Best Fried Pickles Creations
Now that you have the secrets to getting those pickles perfectly crispy—whether deep-fried or in the air fryer—I really want to see what you whip up! Seriously, there is nothing that makes me happier than knowing you took a craving for something satisfying and turned it into a wholesome, easy appetizer right at home.
If you made these or tried the variation, please take a minute to leave a rating down below. Five stars is the goal, obviously, but honest feedback helps everyone who visits this space find the best path forward. If you made the Air Fryer Fried Pickles alternative, I’m especially keen to hear how that turned out for you!
Did you use them for a big game day spread? Did you tweak that dipping sauce recipe? Snap a photo and share it with me! You can always reach out directly through my contact page if you have specific questions or want to share your experience making these fantastic Fried Pickles.
Happy cooking, and I hope these bring a little crunchy joy to your next gathering!
PrintCrispy Fried Pickles: The Best Easy Appetizer Recipe
Make perfectly crunchy, golden fried pickles at home in under 30 minutes. This easy recipe delivers the tangy snack you crave, perfect for game days or parties, served with a simple dipping sauce.
- Prep Time: 10 min
- Cook Time: 15 min
- Total Time: 25 min
- Yield: 4 servings 1x
- Category: Appetizer
- Method: Deep Frying
- Cuisine: American
- Diet: Vegetarian
Ingredients
- 2 cups dill pickle chips or spears
- 1 cup all-purpose flour
- 1 teaspoon salt
- 1 teaspoon black pepper
- 1 teaspoon paprika
- 1/2 teaspoon garlic powder
- 1/4 teaspoon cayenne pepper
- 1 large egg
- 1/2 cup milk
- 1 cup panko breadcrumbs (for extra crispiness)
- Vegetable oil, for frying
- For Dipping Sauce: 1/2 cup mayonnaise, 1/4 cup sour cream, 1 tablespoon hot sauce, 1 teaspoon dried dill
Instructions
- Drain the pickle slices thoroughly and pat them completely dry with paper towels. This step is key for crispiness.
- In a shallow dish, whisk together the flour, salt, pepper, paprika, garlic powder, and cayenne pepper.
- In a second shallow dish, whisk the egg and milk together until combined.
- In a third shallow dish, place the panko breadcrumbs.
- Dredge each pickle slice first in the flour mixture, shaking off any excess.
- Dip the floured pickle into the egg mixture, allowing excess to drip off.
- Coat the pickle completely in the panko breadcrumbs, pressing gently to adhere. Place coated pickles on a clean plate.
- In a deep, heavy-bottomed pot or deep fryer, heat about 2 inches of vegetable oil to 375°F (190°C). Use a thermometer to monitor the temperature.
- Carefully place pickles into the hot oil in small batches, ensuring not to overcrowd the pot.
- Fry for 1 to 2 minutes per side, until golden brown and crisp.
- Remove the fried pickles with a slotted spoon and place them on a wire rack lined with paper towels to drain excess oil.
- While the pickles cool slightly, prepare the dipping sauce by mixing the mayonnaise, sour cream, hot sauce, and dried dill in a small bowl.
- Serve your crispy fried pickles immediately with the homemade ranch dipping sauce.
Notes
- For the best results and maximum crunch, ensure your pickles are very dry before breading.
- If you prefer an Air Fryer Fried Pickles alternative, spray the coated pickles lightly with cooking spray and air fry at 400°F (200°C) for 8-10 minutes, flipping halfway through.
- This recipe makes a great Texas Roadhouse Fried Pickles copycat when using a similar seasoning blend.
Nutrition
- Serving Size: 1 serving (approx. 10 pickles)
- Calories: 350
- Sugar: 3
- Sodium: 950
- Fat: 25
- Saturated Fat: 4
- Unsaturated Fat: 21
- Trans Fat: 0
- Carbohydrates: 25
- Fiber: 1
- Protein: 6
- Cholesterol: 55