
If you’re anything like me when the crisp air hits, you crave something intensely flavorful but honestly, you don’t have time for fussy layering or complicated pastry work. That’s where this recipe for pumpkin crunch cake swoops in to save the day! It’s the ultimate easy fall dessert that delivers that magical textural contrast: deeply creamy, spiced pumpkin meeting that addictive, buttery pecan crunch. When my marketing career ramped up and life felt overwhelming, I swore off anything that required true precision. This cake became my answer—a reliable, delicious way to bring comfort back to the table without adding stress. Trust me, once you make this, it immediately jumps to the top of your list for quick healthy desserts and holiday tables.
- Why This Easy Pumpkin Crunch Cake Recipe is a Must-Try
- Gathering Ingredients for Your Perfect Pumpkin Crunch
- Step-by-Step Guide to Making the Layered Pumpkin Dessert
- Expert Tips for the Best Pumpkin Crunch Recipe Success
- Ingredient Notes and Substitutions for This Simple Pumpkin Dessert
- Serving Suggestions for Your Holiday Crunch Cake
- Storage and Reheating Instructions for Pumpkin Crunch
- Frequently Asked Questions About Pumpkin Crunch Cake
- Sharing Your Autumn Spice Desserts Experience
Why This Easy Pumpkin Crunch Cake Recipe is a Must-Try
Listen, I get it. You want all the cozy fall flavors of Thanksgiving but maybe your oven space is already dedicated to the turkey. That’s why this Easy Pumpkin Crunch Cake is a game-changer. It’s incredibly simple to assemble, and frankly, it’s the ultimate Crowd Pleaser Desserts because everyone adores the layers.
- It uses a basic yellow cake mix, so cleanup is totally minimal.
- The texture contrast between the creamy filling and the streusel is just heavenly.
- It’s perfect for make-ahead holiday baking!
You can find more simple, delicious recipes like my sweet sugar cookie bars over here, but nothing beats this crunch for autumn.
Gathering Ingredients for Your Perfect Pumpkin Crunch
The beauty of this dessert is that it leans on staples we often already have—which is why it’s so perfect when you need a last-minute Thanksgiving Desserts No Pie option! You don’t need specialty flours or obscure extracts here, just good quality basics.
Before you start mixing, let’s talk pumpkin puree. Since the pumpkin layer is the heart of this soft, Moist Pumpkin Layer Dessert, please, please use 100% pure pumpkin puree, not pumpkin pie filling. That filling already has spices and a ton of extra sugar, and we need control over that spiced flavor to balance the sweetness of the cake mix.
Here is exactly what you need to gather up for success in your kitchen:
- 1 box (15.25 oz) yellow cake mix (this is the star for the crust and topping!)
- 1 cup unsalted butter, melted – keep it warm but not sizzling
- 1 cup chopped pecans – make sure they are rough chopped!
- 1 can (15 oz) pure pumpkin puree
- 1 can (14 oz) sweetened condensed milk
- 2 large eggs
- 1 teaspoon pumpkin pie spice
- 1 teaspoon vanilla extract
See? So simple! When I was struggling to find time to cook a few years ago, finding recipes that relied on reliable pantry items like these, just like in my roasted sweet potato side dish, was key to staying nourished.
Step-by-Step Guide to Making the Layered Pumpkin Dessert
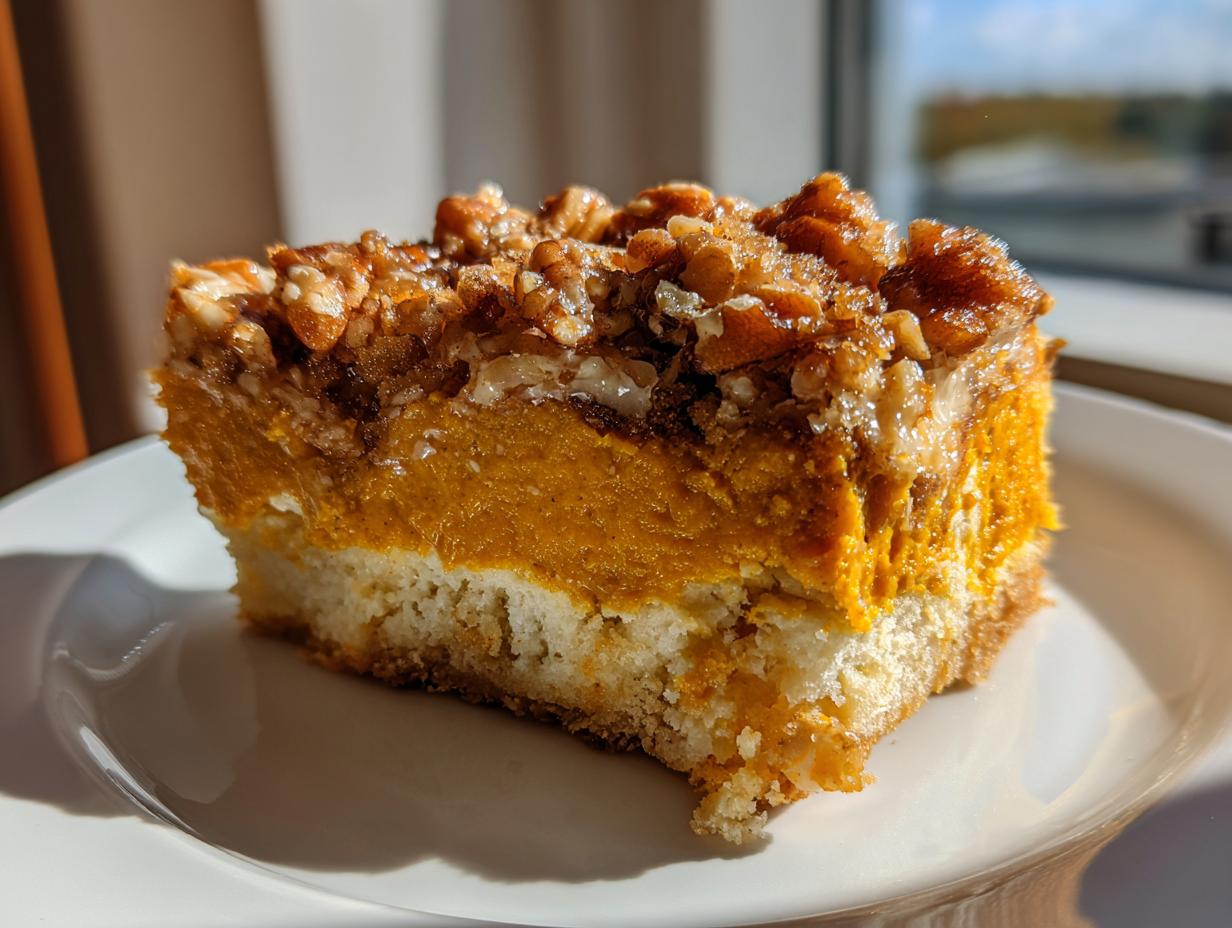
This is where the magic happens, and honestly, it’s so straightforward you’ll wonder why anyone makes pumpkin pie anymore! We are creating distinct layers here, which is what gives this dessert its incredible appeal. First things first: preheat that oven to 350°F (175°C) and get that 9×13 baking dish greased up properly. No sticking allowed!
Preparing the Crust and Buttery Pecan Topping Dessert Base
We are using that cake mix in two different ways here, so measure carefully! Take about half of your dry yellow cake mix and toss it in a bowl with the melted butter. You need to smash those together until it looks crumbly, like wet sand. Press that mixture firmly and evenly into the bottom of your prepared pan. This is our base layer. Pop it into the oven for just 10 minutes to set up slightly. Don’t walk away—we just want it barely baked!
Creating the Creamy Pumpkin Filling Treat
While that crust is doing its quick bake, you need to put together the creamy center. In a separate bowl, grab your pumpkin puree, the whole can of sweetened condensed milk, those two eggs, the spice, and the vanilla. Whisk it until it looks uniformly smooth and beautiful. You aren’t looking for fluffy here, just perfectly combined so there are no streaks of egg or unmixed milk.
Assembling and Baking Your Pumpkin Crunch
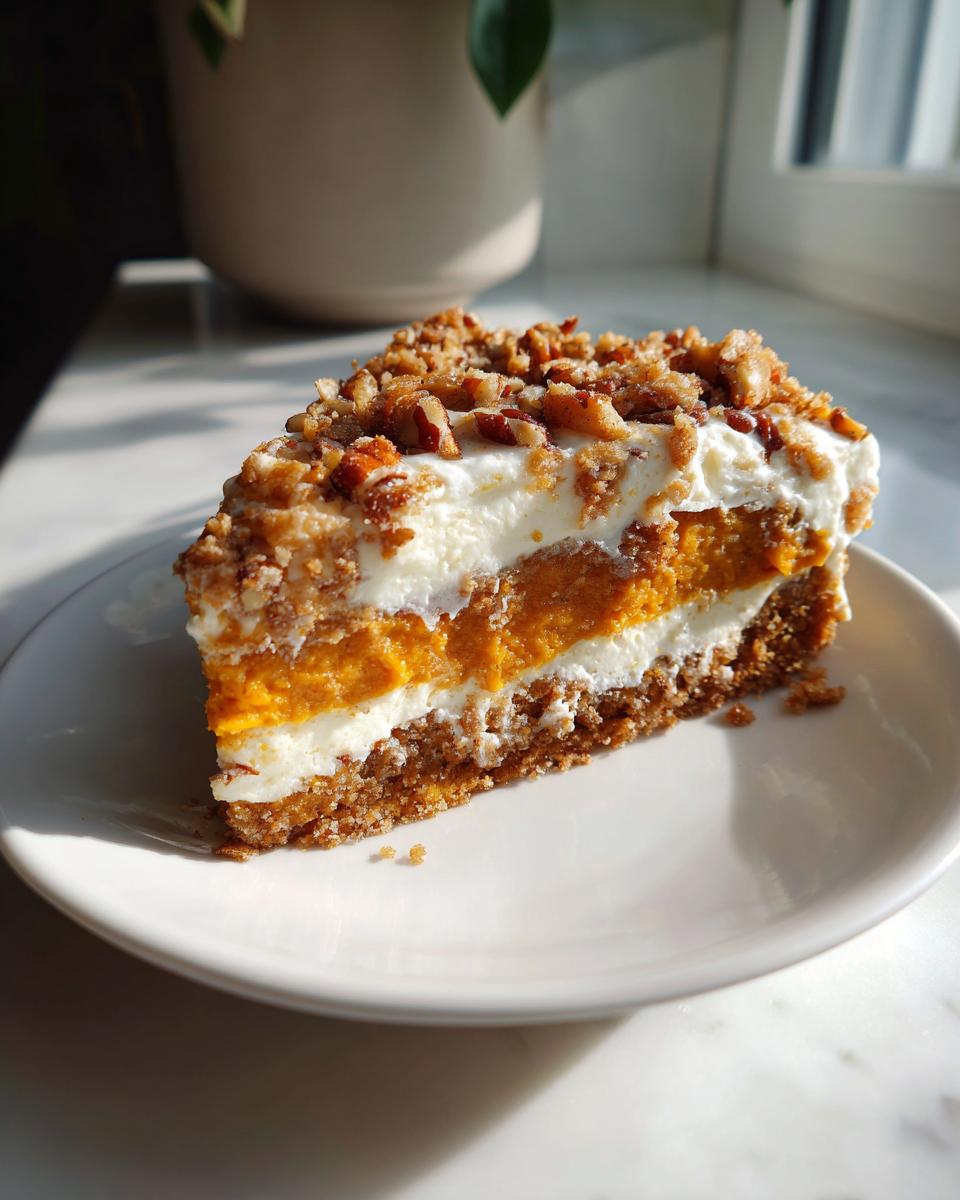
Now for the fun part! Pull that crust out. Take the pecans and mix them with the rest of your reserved dry cake mix—this becomes the crunchy middle layer. Sprinkle that pecan mixture right over the warm crust. Gently pour that creamy pumpkin mixture on top of that crunchy pecan layer. Finally, sprinkle whatever dry cake mix you have left over the very top. This is the final streusel crown for your pumpkin crunch! Bake this whole masterpiece for about 45 to 55 minutes. The toothpick test is key—it should come out clean when you test the center. This recipe is so much easier than my classic apple tart, but just as rewarding!
Expert Tips for the Best Pumpkin Crunch Recipe Success
You nailed the assembly—congratulations! But I have a couple of little secrets that take this pumpkin crunch from good to absolutely unbelievable, especially when you’re dealing with a busy holiday schedule. The first tip is about those pecans. If you can spare five minutes, throwing those chopped pecans onto a dry skillet over medium heat until they just start smelling fragrant (lightly toasted!) makes a huge difference in the depth of that nutty flavor in the final topping.
My biggest piece of advice, though, is about patience after it comes out of the oven. I know you want to slice into that warm, gooey center immediately, but resist! Because this dessert has that creamy filing layer sandwiched between the cake mix, it needs time to fully set up. If you cut it warm, it just turns into a messy scoop. You absolutely must let your pumpkin crunch cool completely, and honestly, chilling it for at least four hours makes it taste even better.
That chilling time firms up the layers perfectly, making those satisfying slices everyone loves. You can even make it the day before! If you’re prepping ahead, I have some great tips for mini banana bread loaves that also benefit from chilling.
Ingredient Notes and Substitutions for This Simple Pumpkin Dessert
We all have those days where a key ingredient decides to vanish right when we need it most! Don’t panic if an item on this list is missing. This recipe is surprisingly forgiving, which is why I love calling it my go-to for Simple Pumpkin Dessert emergencies.
Let’s talk nuts first. I used pecans because their buttery flavor just sings with the autumn spices, but if you have a nut allergy or just ran out, you have options! Walnuts are a fantastic, easy substitute, though they are slightly earthier. If you want to avoid nuts entirely, try substituting the pecan and dry mix layer with an equal amount of rolled oats mixed with a little extra melted butter and maybe a tablespoon of brown sugar. That gives you a lovely, rustic crisp texture underneath that pumpkin layer.
What about the cake mix? That convenience item is crucial because it provides the structure for both the bottom crust and the top streusel. If you only have white cake mix, go ahead and use it! It will result in a slightly less rich, paler topping, but the flavor will still be wonderful. If you happen to have butter cake mix, that’s actually a terrific swap since it already has a bit more fat content built in. Just try to avoid chocolate, obviously! I find mixing simple pantry items the best way to keep things stress-free, just like when I whip up my creamy maple fudge.
Finally, on the sweetness front, it absolutely must be sweetened condensed milk. Please don’t try to substitute evaporated milk and sugar—the texture of the filling relies on that thick, sugary base to set up properly when baked. It’s one of the few non-negotiable items in this entire recipe!
Serving Suggestions for Your Holiday Crunch Cake
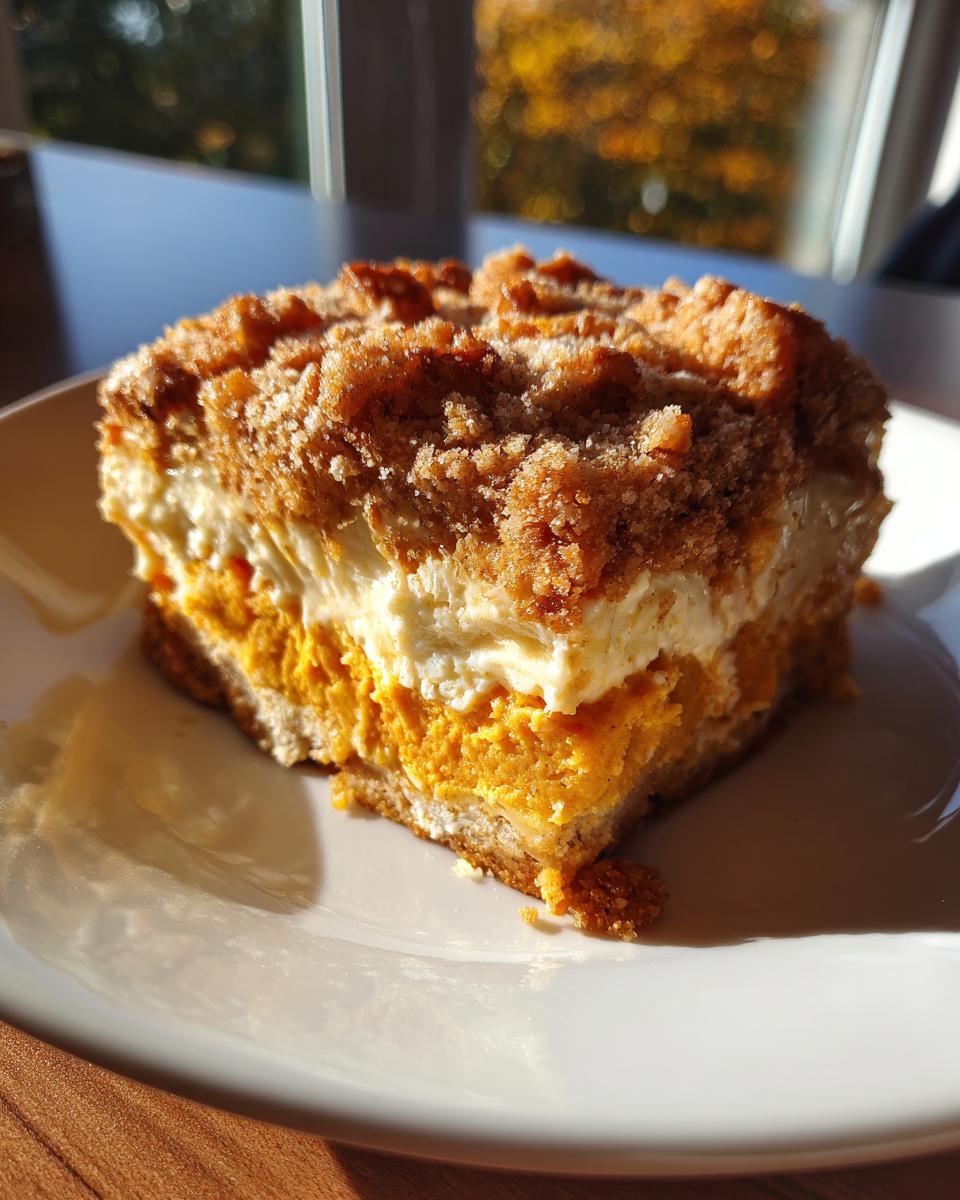
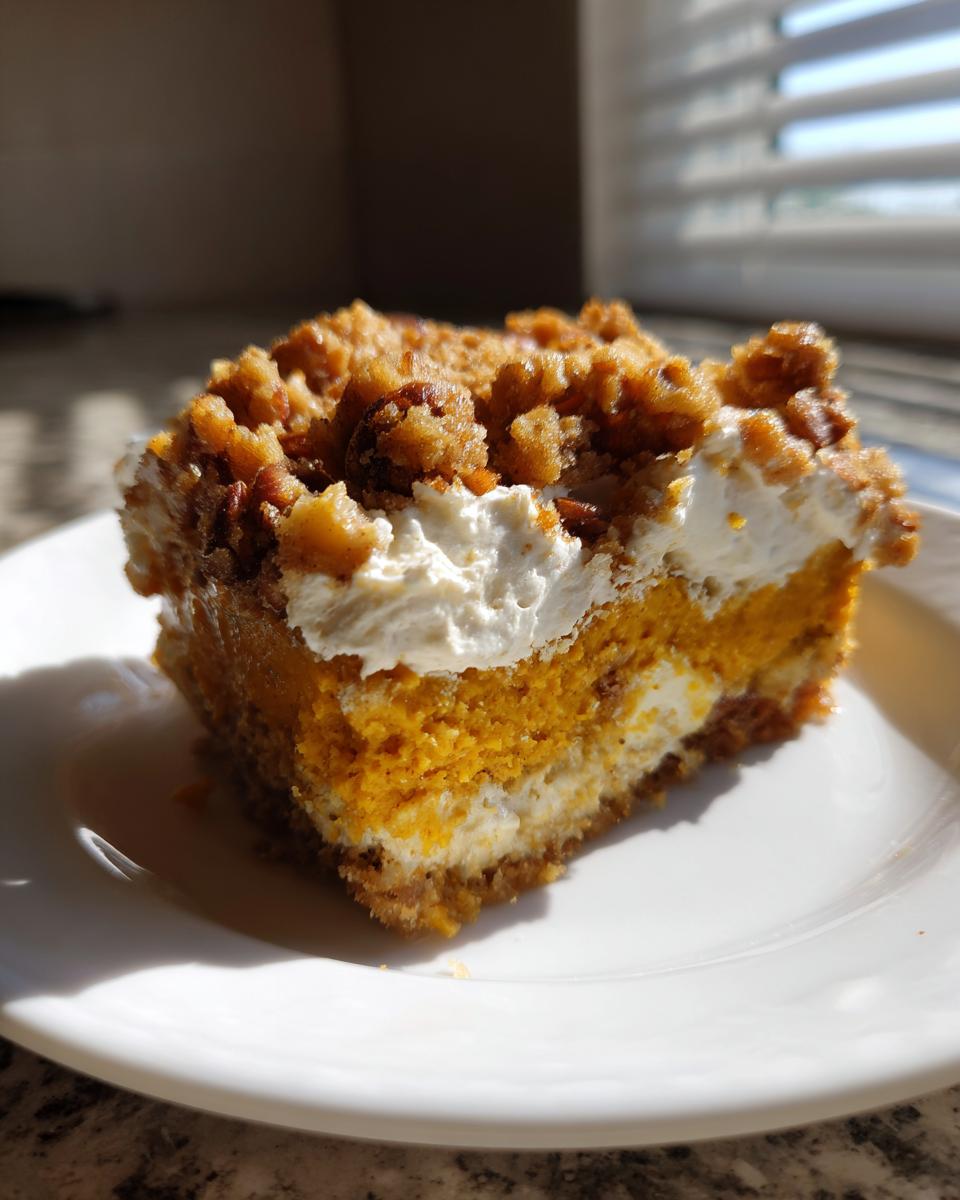
Once your pumpkin crunch has chilled out and firmed up perfectly, it’s time to decide how you want to serve it up! Because this dessert is already so rich and flavorful—it’s basically a layered cake and pie all in one—it really doesn’t need much fuss. But if you’re feeling extra festive, a dollop of freshly whipped cream makes everything better.
I often keep a can of whipped cream handy during the holidays just for moments like this. If you want to go a little warmer, a scoop of vanilla ice cream right when you serve it is divine; the contrast between the warm spice of the cake and the cold cream is just heavenly. Sometimes, when I’m feeling lazy, I just dust it with a tiny bit more cinnamon, like I would my fluffy pancakes, and call it a day. It’s always a winner!
Storage and Reheating Instructions for Pumpkin Crunch
Okay, you made it—and congratulations, you have leftovers! While this is truly the best when eaten the day after baking, how you store and serve this pumpkin crunch makes a big difference in maintaining that perfect texture.
Because we have that luscious, creamy pumpkin filling in the middle, you absolutely must store this dessert covered tightly in the refrigerator. Don’t leave it out on the counter! It’s not like a standard pound cake; the texture won’t hold up as well, and for food safety, the dairy in the filling needs to stay cold.
The debate I always have with myself is serving temperature. Honestly, this cake is fantastic served straight from the fridge. It’s dense, cool, and the layers are super firm, making for clean, beautiful squares—perfect for a casual holiday buffet. If you prefer it softer, just pull the covered dish out onto the counter about an hour before you plan to serve it. That hour allows it to warm up just slightly, letting the spices bloom a bit more without letting the filling get too soft.
I never reheat slices of this individually because the crunch topping can get sad if microwaved! If you are prepping ahead and making it a day in a half early for something like game day, these pizza pinwheels are a better make-ahead option, but for eating fresh, refrigeration is definitely the way to go for your pumpkin crunch.
Frequently Asked Questions About Pumpkin Crunch Cake
Is this officially a Pumpkin Dump Cake Style dessert?
That is such a good question! People often call it that because the assembly is so incredibly easy—you’re basically just layering ingredients! However, true dump cakes usually involve pouring the wet ingredients *over* everything and letting it bake without any pre-baking. Since we pre-bake that bottom crust for 10 minutes and then sprinkle the top layer on, it’s technically a layered cake assembly rather than a true dump cake. But look, if you’re short on time, just toss it all in and skip the pre-bake—it will still be delicious, just a little softer on the bottom! It’s certainly one of the most Simple Pumpkin Desserts available.
Can I make this dessert ahead of time for a busy day like Thanksgiving?
Yes, you absolutely can! In fact, I recommend it! As I mentioned before, this Holiday Crunch Cake sets up beautifully overnight. You need that chilling time for the creamy layer to firm up around the crunchy bits, which makes those clean squares so much easier to serve to your guests. Just store it covered tightly in the fridge. It’s truly one of the best quick, easy weeknight dinners replacements for dessert!
How different is this from the Hawaiian Pumpkin Crunch Recipe I see online?
That’s a great area where people get confused! The classic layered recipe we made here, which uses cake mix and pecans, is widely popular across the mainland for fall baking. The Hawaiian Pumpkin Crunch Recipe (often associated with Sam Choy) is traditionally quite different. The Hawaiian version usually involves a cooked pumpkin custard filling and a distinctive custard or cream topping that isn’t layered with the dry cake mix on top. Our version focuses more on that satisfyingly crunchy streusel texture throughout because of how we use the dry cake mix components!
Why is the pecan topping important for the overall texture?
The topping is everything! It’s what makes this a Layered Pumpkin Dessert and not just a baked pumpkin pudding. If you skip the nuts or the final sprinkling of dry cake mix, you lose that essential textural surprise against the creamy filling. That buttery, slightly sandy crumble gives you the “crunch” that defines this entire treat!
Sharing Your Autumn Spice Desserts Experience
Alright, now that your kitchen smells like pure autumn heaven and you’ve successfully navigated creating this amazing pumpkin crunch, I truly want to hear about it! We busy people deserve recognition when we pull off a crowd-pleasing dessert like this without turning our evening upside down.
Please, stop by and leave a star rating below if this recipe made your fall baking easier and more delicious. If you have a moment, drop a comment and tell me—how did this layered treat stack up against your usual traditional pumpkin pie? Did your family notice the difference?
I always love seeing your creations! If you snap a picture of your perfectly set squares, tag me on social media so I can see your results. And if you ever have questions or want to chat about other ways to simplify your approach to wholesome food, my contact page is always open. Happy baking, friends!
PrintEasy Layered Pumpkin Crunch Cake Recipe
Prepare this simple, crowd-pleasing dessert that contrasts a moist pumpkin layer with a buttery, crunchy pecan topping. This recipe is perfect for fall gatherings and requires minimal effort.
- Prep Time: 15 min
- Cook Time: 55 min
- Total Time: 70 min
- Yield: 12 servings 1x
- Category: Dessert
- Method: Baking
- Cuisine: American
- Diet: Vegetarian
Ingredients
- 1 box (15.25 oz) yellow cake mix
- 1 cup unsalted butter, melted
- 1 cup chopped pecans
- 1 can (15 oz) pure pumpkin puree
- 1 can (14 oz) sweetened condensed milk
- 2 large eggs
- 1 teaspoon pumpkin pie spice
- 1 teaspoon vanilla extract
Instructions
- Preheat your oven to 350°F (175°C). Lightly grease a 9×13 inch baking dish.
- In a medium bowl, combine the dry yellow cake mix and the melted butter until crumbly. Press this mixture evenly into the bottom of the prepared baking dish to form the crust layer.
- Bake the crust for 10 minutes. Remove from the oven.
- While the crust bakes, prepare the pecan topping. In a separate bowl, mix the chopped pecans with half of the dry cake mix mixture reserved from step 2. Sprinkle this pecan mixture evenly over the partially baked crust.
- In another bowl, whisk together the pumpkin puree, sweetened condensed milk, eggs, pumpkin pie spice, and vanilla extract until smooth. This is your creamy filling.
- Gently pour the pumpkin filling over the pecan-cake mix layer in the baking dish.
- Sprinkle the remaining dry cake mix/butter mixture evenly over the top of the pumpkin layer.
- Bake for 45 to 55 minutes, or until the center is set and a toothpick inserted near the center comes out clean.
- Let the pumpkin crunch cake cool completely before slicing and serving. Serve chilled or at room temperature.
Notes
- For an extra crunchy topping, toast the pecans lightly before mixing them with the cake mix.
- This dessert tastes best after chilling for at least 4 hours, allowing the layers to set firmly.
- Serve this treat with a dollop of whipped cream or vanilla ice cream for added richness.
Nutrition
- Serving Size: 1 square
- Calories: 380
- Sugar: 35
- Sodium: 250
- Fat: 22
- Saturated Fat: 10
- Unsaturated Fat: 12
- Trans Fat: 0
- Carbohydrates: 45
- Fiber: 2
- Protein: 5
- Cholesterol: 45