
Don’t you just crave those moments when you pull something truly elegant out of the oven, something that looks like it took you all day, but secretly only took about an hour? That’s exactly where this easy apple tart fits in! When I was juggling my marketing job and trying to keep up that connection to real food, I needed recipes that delivered big flavor without the fuss. This Tarte aux Pommes—the classic French apple tart—is my answer to those hectic days.
The beauty here is achieving that lovely, flaky crust and perfectly arranged fruit without spending three hours wrestling with homemade pastry. Trust me, we are using a shortcut here that still honors the final delicious result. My goal with Pure Plate Path is always to bring nourishing, simple meals—or in this case, beautiful desserts—right to your table!
You can grab the recipe for my classic old-fashioned apple crisp if you have apples leftover, but you absolutely have to try this tart first.
- Why This Easy Apple Tart Recipe Works for Busy Cooks
- Ingredients for Your Classic French Apple Tart
- Step-by-Step Instructions for the Perfect Apple Tart
- Tips for an Elegant Apple Tart Every Time
- Variations on the Classic Apple Tart
- Storage and Reheating Your Homemade Pastry Apple Tart
- Serving Suggestions for This Simple Apple Dessert
- Frequently Asked Questions About Making an Apple Tart
- Nutritional Snapshot of This Simple Apple Dessert
Why This Easy Apple Tart Recipe Works for Busy Cooks
I get it—you need results, and you need them fast. That’s why this apple tart recipe is a staple in my own rushed weeks. It gives you that showstopper quality you want for guests but respects your limited time. We’re focusing on practical elegance here!

- Speedy Assembly: Total time is under an hour! We ditch the chilling time usually required for homemade pastry.
- The Shortcut Secret: We lean on good quality store-bought puff pastry. It’s already buttery and flaky, which is half the battle won right there.
- High Flavor Payoff: Even with simple steps, the combination of cinnamon and baked apples feels incredibly elegant and seasonal.
You can check out my tips for quick and easy weeknight dinners, but honestly, getting dessert sorted this fast is a win-win!
Ingredients for Your Classic French Apple Tart
Okay, let’s talk ingredients. This is where we prove that elegant food doesn’t need a complicated shopping list. Since we are aiming for that wonderful buttery crust tart feel without waiting for dough to chill, we are embracing a simple, wonderful shortcut. Seriously, don’t let anyone judge you for using quality puff pastry!
Here is what you need to gather up. Remember, the quality of the apples really makes the difference here, so pick the best ones you can find.
- 1 sheet store-bought puff pastry or a homemade flaky tart crust
- 4 large baking apples, peeled, cored, and thinly sliced (aim for about 1/8 inch thick—thin slices cook evenly!)
- 1/4 cup granulated sugar
- 1 tablespoon all-purpose flour (this helps absorb some liquid!)
- 1 teaspoon ground cinnamon
- 1 tablespoon fresh lemon juice
- 2 tablespoons unsalted butter, cut into small, even dots
- 1 egg, beaten well (this is just for brushing the edges—our egg wash!)
That’s it! Minimal ingredients for maximum seasonal flavor. See? This simple apple dessert is practically begging you to make it right now.
Step-by-Step Instructions for the Perfect Apple Tart
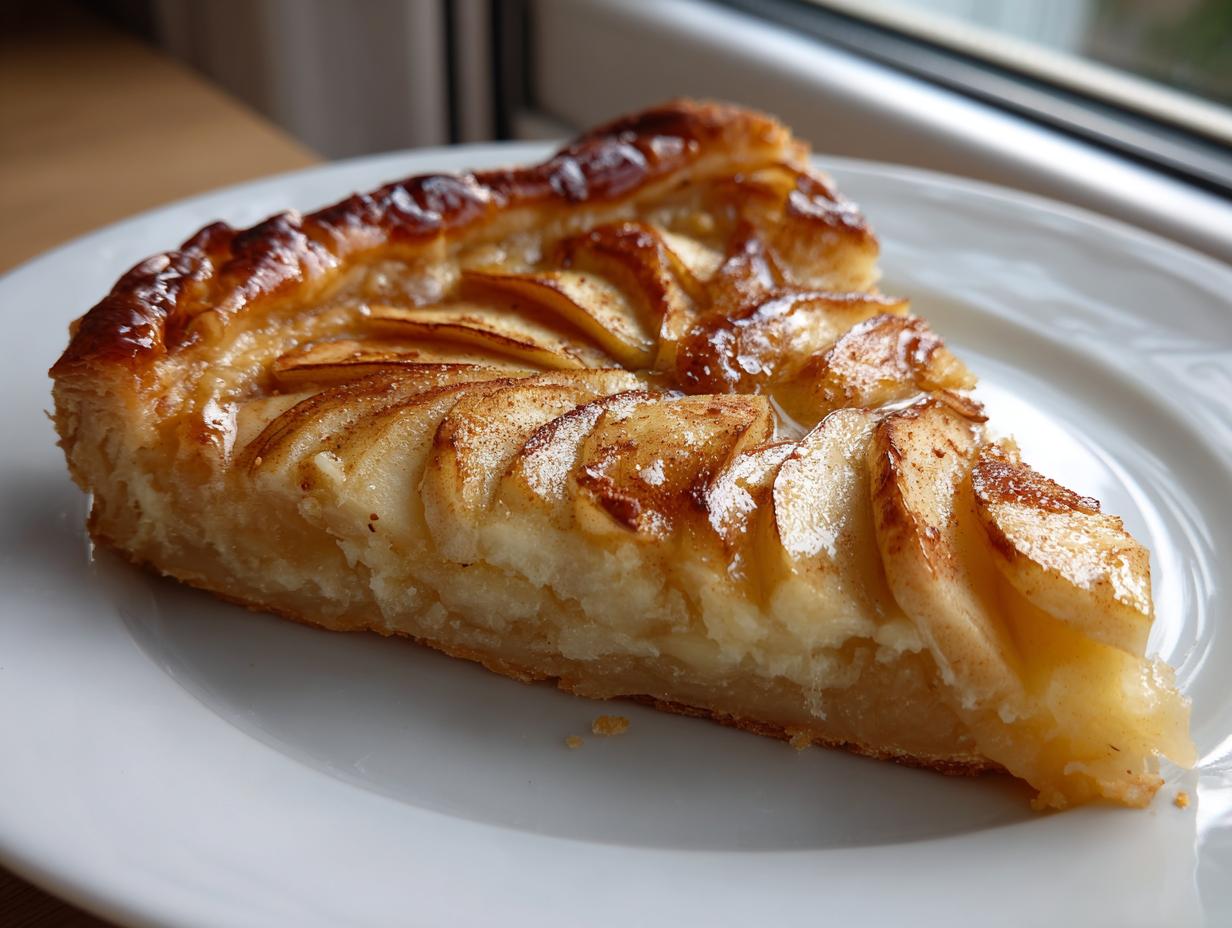
We’re moving right along! This is where the magic happens, and honestly, it’s so straightforward you’ll feel like a total pro. Remember, even if you decide to make a *rustic apple tart*—meaning, just piling things beautifully onto a round of pastry and folding the edges slightly—it still looks like something you’d order at a fancy French cafe.
We want those apples tender but not mushy, and the crust golden brown. Pay attention to the slicing; that’s key to texture!
Preparing the Pastry Base and Apples for Your Apple Tart
- First things first, get your oven warm! Preheat to 400°F (200°C). You need that heat right away. Line a standard baking sheet—I use parchment paper every single time to prevent sticking.
- If you’re using store-bought puff pastry, let it thaw just according to the package directions. You can either carefully roll it out to fit a 9-inch tart pan (if you have one and want sharp sides) or just leave it as a gorgeous, shaggy round right on that lined baking sheet for that lovely rustic look.
- Now for the apples! Peel, core, and slice those four beauties super thin—about 1/8 of an inch is perfect so they cook evenly. In a nice big bowl, toss those apple slices gently with the sugar, flour, and cinnamon until everything is speckled and coated nicely. This mix is what gives your apple tart its flavor backbone!
Assembling and Baking the Rustic Apple Tart
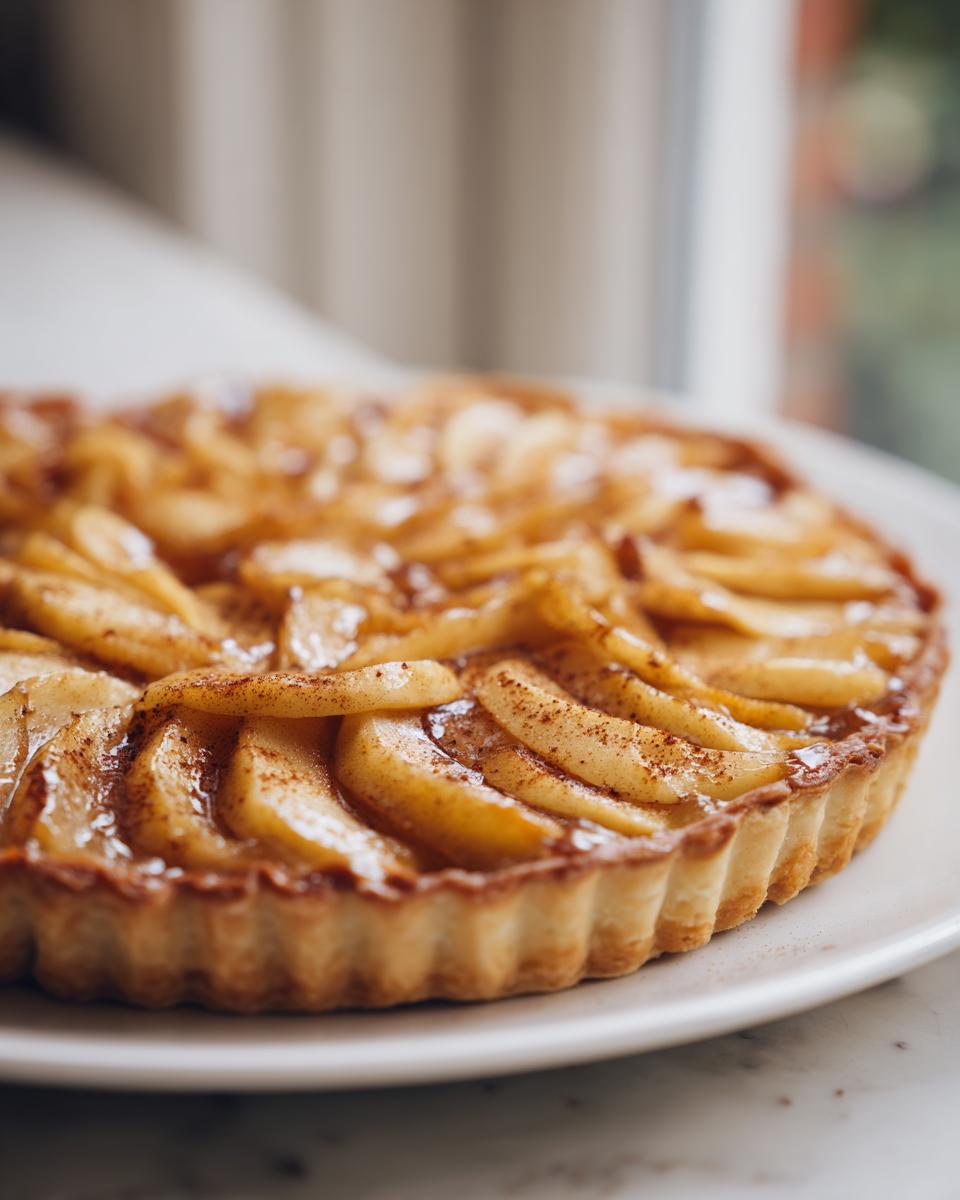
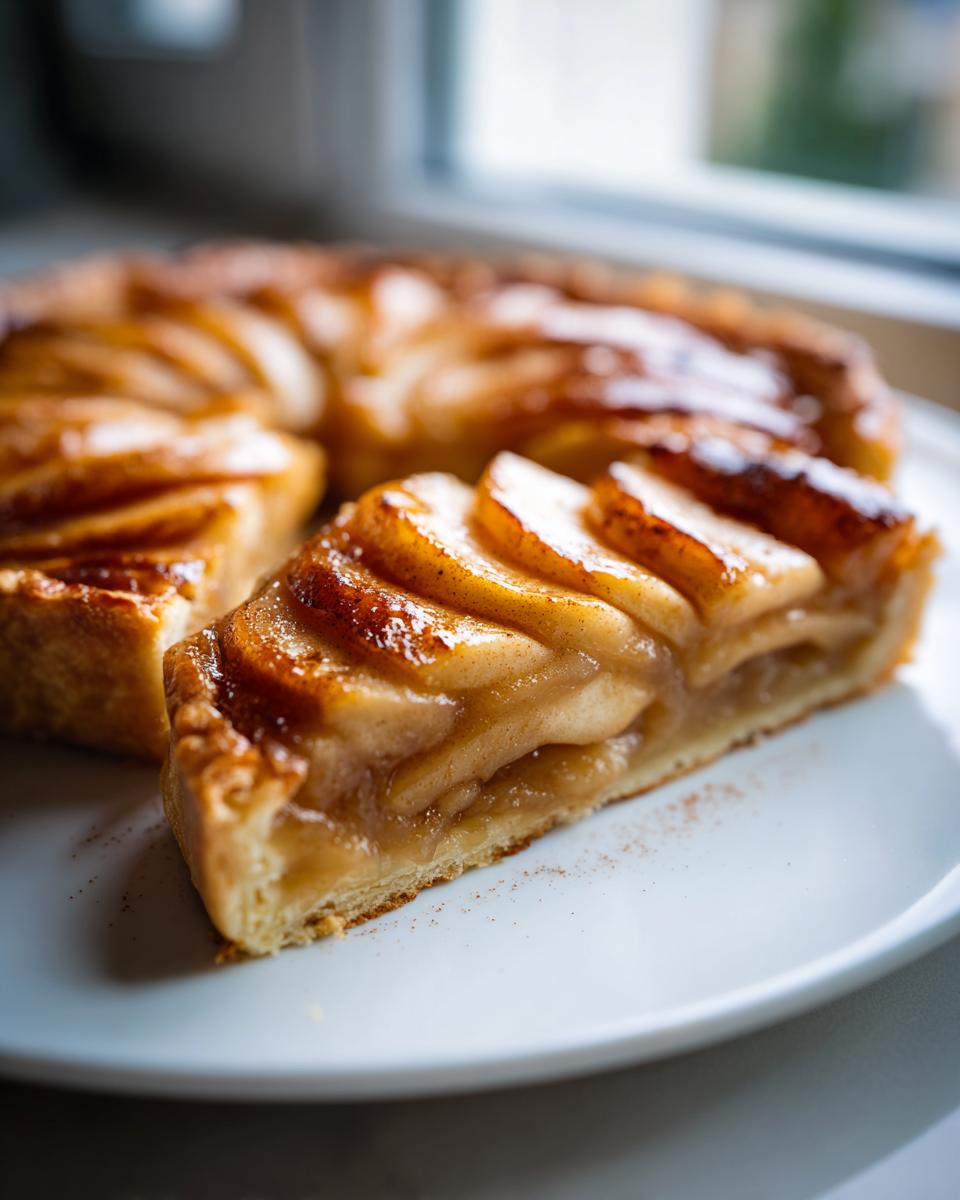
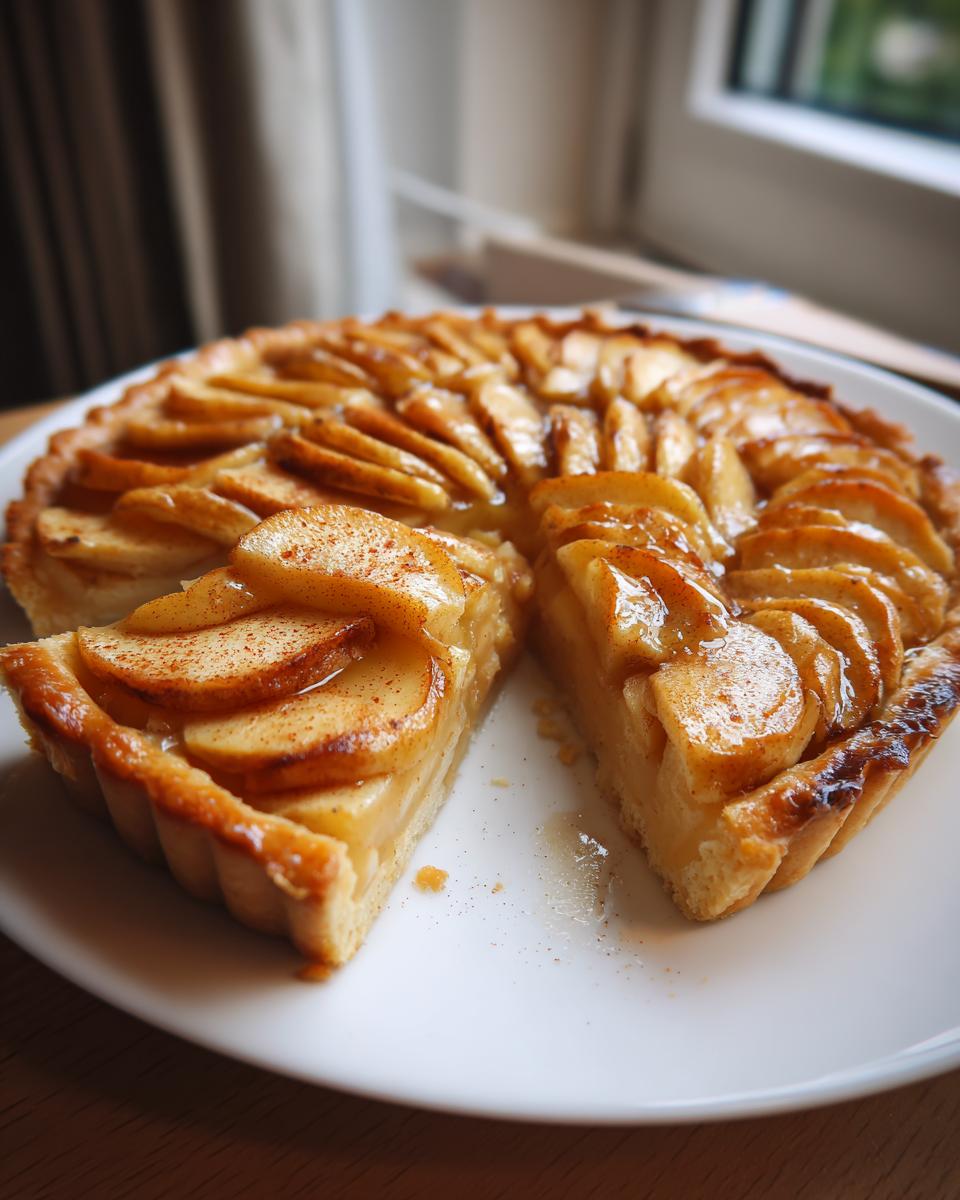
- Arrange your coated apples right over the pastry base. You can go for neat, overlapping rows for that classic look, or just heap them on. No judgment here!
- Next, give everything a little spritz of lemon juice (that prevents browning, remember?) and then dot the top surface with those tiny pieces of cold unsalted butter. These melt down into little pockets of goodness during baking.
- Take your beaten egg and gently brush it onto just the exposed edges of the pastry. That’s your egg wash, and it’s what makes the crust beautifully golden brown.
- Bake this beauty for 30 to 35 minutes. Keep an eye on it! If you notice the edges getting too dark before the apples are soft, just tent them loosely with a small piece of foil. This helps the center cook through without burning the crust.
When it comes out, let that apple cinnamon tart cool down just a tiny bit before you slice it. If you need more baking inspiration once you master this, check out my favorite ideas for healthy desserts that satisfy!
Tips for an Elegant Apple Tart Every Time
Even though this is an easy apple tart recipe, we still want it to look and taste like it came from a fancy patisserie, right? The biggest hurdle people face is always the dreaded soggy bottom. If you decide to skip the store-bought pastry and go for a glorious homemade flaky tart crust, you have to bake that bottom crust blind first. Just line it with parchment and fill it with pie weights or dried beans for about 15 minutes before you add your filling.
For the apples, I always mix Granny Smith for a little tartness with Honeycrisp for that firm, sweet bite. That balance is heaven! If you want that extra elegant, beautiful look, thinner slices are your friend. I actually love getting inspiration sometimes from other bakers, like checking out this amazing rustic French apple tart approach. It really shows you how a simple arrangement can elevate the whole dessert!
If you’re looking for ways to simplify other parts of your cooking, I have a fantastic recipe for easy egg bites that saves so much morning stress!
Variations on the Classic Apple Tart
I know the base recipe for this French apple tart is fantastic, but sometimes you just need to switch things up, especially when apples are flowing out of the farmer’s market and into your kitchen! Don’t worry, we can take this simple foundation and turn it into something totally new while keeping the prep time fairly low.
The two biggest requests I get are for a little crunch on top or something extra rich and creamy underneath. I’ve tested both ways plenty of times; these variations are simple add-ons that make a big difference!
If you’re looking for more easy, comforting bakes after you master this tart, you should definitely look at my recipe for sweet potato brownies! They scratch that same cozy dessert itch.
For the Apple Crumble Tart Lover:
If you think an apple tart isn’t complete without that satisfying, buttery, spiced crunch, then we are making an apple crumble tart! Right before you pop the tart into the oven, you just need to make a quick streusel topping. Mix about 1/2 cup of flour, 1/4 cup of packed brown sugar, 1/4 cup of cold, cubed butter, and maybe 1/2 teaspoon of cinnamon. Use your fingers to rub it together until it looks like coarse crumbs. Sprinkle this right over the arranged apples, covering them completely. It bakes up beautifully crisp alongside the fruit!
For the Rich and Elegant Apple Tart with Custard:
Want something that feels a little more deeply indulgent? This is where the apple tart with custard comes in. It’s still quick because we aren’t making a complicated pastry cream! Just before you layer the apples, gently whisk together 1/4 cup of heavy cream with one egg yolk and maybe a tiny tiny pinch of nutmeg. Pour this mixture slowly and evenly over the arranged apples on the pastry base—it will settle into the gaps. As it bakes, it sets into a smooth, delicate layer that makes this an absolutely decadent seasonal fruit tart!
Storage and Reheating Your Homemade Pastry Apple Tart
I know sometimes we don’t finish the whole gorgeous homemade pastry apple tart in one sitting, and that’s okay! Since this recipe doesn’t use a rich custard layer (unless you added one!), you can actually leave it right on the counter, covered loosely, for up to 24 hours. The sugar and butter help preserve it through the first day.
If you need longer storage—say, up to three days—pop it in the fridge. But here’s the key for reheating: don’t use the microwave! That just softens the crust. Instead, place a slice directly on a baking sheet in a 325°F oven for about 8 to 10 minutes. That quick blast of heat re-crisps the pastry perfectly. It brings back that fresh-out-of-the-oven satisfaction!
Serving Suggestions for This Simple Apple Dessert
You did it! You pulled that beautiful, golden **apple tart** out of the oven, and now it’s time to make the experience even more memorable. Pairing is half the fun, honestly. This dessert is designed to be simple, but the toppings can take it straight to five-star territory.
Honestly, my very favorite way to enjoy this is letting it cool just slightly—warm fruit and crisp pastry is the ultimate texture contrast. Then, I just grab a big scoop of vanilla ice cream. The ice cream melts right into the warm apples and the buttery crust juices? Oh my goodness, it’s heavenly.
If you aren’t an ice cream person, here are a couple of other simple ways to dress up your **seasonal fruit tart**:
- Whipped Cream: Make sure you whip it fresh! A light dusting of powdered sugar over the whipped cream adds a professional touch.
- A Light Glaze: If you didn’t opt for the custard, you can always whip up a simple drizzle of powdered sugar mixed with a tiny bit of milk and maybe a drop of vanilla or orange extract. It gives it a lovely shiny finish.
- A Dusting of Spice: Sometimes, just a final light sprinkle of cinnamon right before serving does the trick, especially if you’re looking for that *apple cinnamon tart* vibe.
This truly completes the experience, turning a quick bake into a special moment. And if you’re looking for a surprisingly savory pairing sometime, I have a recipe for an easy creamy garlic sauce that would totally surprise you!
If you want to see how the French really present their classic versions, you should take a peek at these ideas for the classic Tarte aux Pommes. They all achieve that simple elegance we are aiming for!
Frequently Asked Questions About Making an Apple Tart
I figured that after walking through the steps for this easy apple tart, you might still have a few little questions rattling around in your head. That’s totally normal! When I was first figuring out how to nail that perfect texture without spending half the day in the kitchen, I had so many questions myself. Here are some of the things readers ask most often about achieving that perfect Tarte aux Pommes!
If you ever have a question that I haven’t covered, please feel free to reach out to me directly via my contact page. I love hearing from you!
What is the best apple to use for a *tarte aux pommes*?
This is such a crucial question for any apple-based bake! You absolutely need apples that hold their shape when heated. Soft apples just disintegrate into mush, and nobody wants that in an elegant French apple tart. I highly recommend using a mix of apples for the best flavor profile. Granny Smith apples give you that lovely tartness that cuts through the sweetness of the sugar, while Honeycrisp or Fuji apples stay firm and offer a nice solid structure as they bake. Avoid Red Delicious or McIntosh unless you are making applesauce!
Can I make this *apple tart recipe* ahead of time?
Yes, but timing matters a lot here, especially concerning the crust! If you try to assemble the whole apple tart and leave it overnight, the juices from the apples will start to soak into the pastry, and you’ll definitely end up with a soggy base. If you want to prep ahead, I suggest slicing your apples and tossing them with the sugar and spices, storing that mixture in an airtight container in the fridge for up to a day. Then, roll out your pastry, assemble everything right before you bake it, and you’ll still save yourself about 20 minutes of prep time right when you need it!
How do I prevent my *apple cinnamon tart* from being watery?
Oh, the dreaded apple puddle! This is where that tiny bit of flour we added to the apple mixture really earns its keep. That flour (or even a teaspoon of cornstarch if you prefer) acts like a sponge. As the apples heat up, they release liquid, and the flour absorbs it, thickening the juices into a light, syrupy glaze instead of letting them pool at the bottom of your crust. Make sure you toss those apples really well so every slice is coated before arranging them!
Nutritional Snapshot of This Simple Apple Dessert
I always like to give everyone a little idea of what’s in the treats we make. While this isn’t meant to be a strict guide—after all, this is dessert we’re talking about!—it’s good to have a general idea of the makeup of this lovely simple apple dessert.
Since we are relying on store-bought puff pastry for speed, please remember that the fat and sodium content can jump up based on what brand you buy versus making a crust totally from scratch. These numbers are just an estimate based on the ingredients listed in the recipe above, assuming a standard puff pastry sheet was used.
- Serving Size: 1 slice
- Calories: 280
- Sugar: 18g
- Fat: 15g
- Saturated Fat: 8g
- Carbohydrates: 35g
- Protein: 3g
If you’re looking for other ways to keep your eating balanced throughout the entire day, I have a great roster of healthy breakfast ideas that keep me fueled when I need energy for a long workday. But for this apple tart? Enjoy every bite guilt-free!
PrintEasy Classic French Apple Tart (Tarte aux Pommes)

Make this simple French apple tart using a buttery crust and thinly sliced apples. This recipe provides a straightforward path to a delicious, elegant dessert perfect for any occasion.
- Prep Time: 20 min
- Cook Time: 35 min
- Total Time: 55 min
- Yield: 8 servings 1x
- Category: Dessert
- Method: Baking
- Cuisine: French
- Diet: Vegetarian
Ingredients
- 1 sheet store-bought puff pastry or homemade flaky tart crust
- 4 large baking apples (like Honeycrisp or Granny Smith)
- 1/4 cup granulated sugar
- 1 tablespoon all-purpose flour
- 1 teaspoon ground cinnamon
- 1 tablespoon lemon juice
- 2 tablespoons unsalted butter, cut into small pieces
- 1 egg, beaten (for egg wash)
Instructions
- Preheat your oven to 400°F (200°C). Line a baking sheet with parchment paper.
- If using puff pastry, let it thaw according to package directions. Roll it out slightly to fit a 9-inch tart pan or leave it as a rustic round on the baking sheet.
- Peel, core, and thinly slice the apples. In a medium bowl, toss the apple slices with the sugar, flour, and cinnamon until evenly coated.
- Arrange the apple slices over the pastry base. You can create a decorative pattern, like overlapping rows, or simply layer them evenly.
- Drizzle the lemon juice over the apples and dot the top with the small pieces of butter.
- Brush the exposed edges of the pastry with the beaten egg wash.
- Bake for 30 to 35 minutes, or until the crust is golden brown and the apples are tender. If the edges brown too quickly, loosely cover them with foil.
- Remove from the oven and let the apple tart cool slightly before slicing and serving.
Notes
- For a more caramelized apple tart flavor, sprinkle an extra tablespoon of sugar over the top before baking.
- If you prefer a custard filling, mix 1/4 cup heavy cream with 1 egg yolk and pour it over the apples before baking.
- This tart pairs well with vanilla ice cream or a light dusting of powdered sugar.
Nutrition
- Serving Size: 1 slice
- Calories: 280
- Sugar: 18g
- Sodium: 150mg
- Fat: 15g
- Saturated Fat: 8g
- Unsaturated Fat: 7g
- Trans Fat: 0g
- Carbohydrates: 35g
- Fiber: 3g
- Protein: 3g
- Cholesterol: 40mg